PBR: Physically Based Rendering on the Web

Physically Based Rendering (PBR) has become the standard for modern 3D graphics because it produces materials that look believable under any lighting conditions. Unlike older empirical models like Phong or Lambert, PBR follows real-world physical principles, ensuring that metal reflects like metal and plastic looks like plastic, regardless of environment. In web based 3D engines like Three.js and Babylon.js, PBR is implemented as a complete pipeline from texture authoring to shader evaluation.

Textures

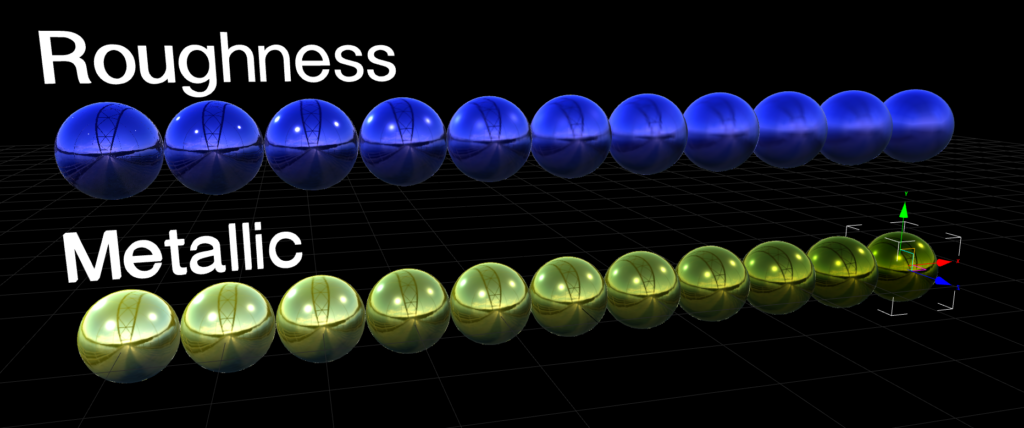
At the heart of PBR are a set of core input textures that describe material properties. They are base color (also known as albedo), metallic, roughness, normal, ambient occlusion (AO) and emission. The base color map provides the color without any light interaction. The metallic map determines whether a surface behaves like metal or not, using a value ranging from 0 to 1. Roughness controls the surface roughness, where a low value would represent a shiny pool ball with reflections and a high value a very dusty rock where light is evenly spread with no visible reflections. Normal maps add fine surface detail that doesn’t need to be modeled such as tiny cracks or even small bolts. Ambient occlusion darkens crevices and simulates indirect shadow. Finally, emissive maps make parts of the surface glow independently of lights.

These input textures are fed into a Bidirectional Reflectance Distribution Function (BRDF) also most commonly known as the microfacet model. Microfacets assume the surface is made of tiny mirror-like facets oriented randomly according to a normal distribution function (NDF), typically GGX. The BRDF combines three terms, the Fresnel effect (view-dependent reflectivity), the geometry term (microfacet shadowing and masking) and the NDF (facet distribution based on roughness).
For metals, the diffuse component is near zero and the specular uses the base color as a tinted mirror, changing the tint of the metal. For non-metals, specular is achromatic white and diffuse uses the base color. This energy-conserving model ensures no more light is reflected than hits the surface.

IBL

To get convincing reflections and indirect light, PBR usually relies on Image-Based Lighting. IBL uses HDRIs to represent light coming from all directions around the object. These maps are prefiltered into different levels of blur so that rough materials sample a more blurred version of the environment. Combined with the BRDF, this allows metals and glossy plastics to respond realistically to their surroundings without the need for many real-time lights in the scene.

Authoring

Authoring PBR textures for the web demands discipline to avoid common pitfalls. Tools like Substance Painter can generate these maps, but exporting them the wrong way can ruin the look. The base color needs to be in sRGB color space, metallic, roughness, normal and AO need to be in a linear color space (non-color data). Roughness should range from around 0.05 for a mirror to 0.9 for matte materials, avoiding the extremes that could look jarring. Metallic usually only uses binary, so either 0 or 1, no in between. There are some exceptions though for materials like metallic paint. Normal maps have to match the tangent space that is expected by the engine. Overly bright HDRIs can wash out scenes and mismatched roughness scales between tools can lead to reflections looking wrong.

Performance Considerations

Performance is a key consideration because PBR shaders are more complex than simple Blinn-Phong (a simple lighting model). Each fragment requires multiple texture lookups, Fresnel calculations, and environment sampling, which can bottleneck on limited devices. Web engines approximate where it is possible. Three.js for example uses a simplified BRDF without full multiple scattering, while Babylon.js’ PBRMaterial supports advanced features like clearcoat but allows disabling reflections or IBL for speed. Optimizations include reducing texture resolution, baking some maps into others such as AO into roughness, and using lower-resolution maps for mobile.

The strength of PBR on the web is portability. Materials authored once look consistent across engines and devices. By mastering the input textures, microfacet BRDF and IBL pipeline, developers can create production quality visuals without proprietary tools. The cost is higher shader complexity but targeted optimizations keep it viable even on modest hardware.

SOURCES

1: https://learnopengl.com/PBR/Theory
2: https://www.cg.tuwien.ac.at/research/publications/2017/OPPITZ-2017-3DM/OPPITZ-2017-3DM-report.pdf
3: https://archdesignmart.in/the-ultimate-guide-to-pbr-materials-understanding-physically-based-rendering/
4: https://www.mathematik.uni-marburg.de/~thormae/lectures/graphics1/code/WebGLShaderMicrofacetBrdf/ShaderMicrofacetBrdf.html
5: https://sbcode.net/threejs/environment-maps/

Morphing Skeletons: Animation Systems for Web

Animation brings 3D scenes to life, turning static models into characters. In web-based 3D, animation is much more than just playing back keyframes. It involves careful management of geometry updates, skinning computations and blending logic to maintain smooth performance. Modern engines like Three.js and Babylon.js support several systems for this, primarily through the glTF format. Each of these systems comes with distinct costs and use cases so it is important for developers to know about them.

Animation Techniques

Skeletal Animation

The most common technique for character animation is skeletal animation, also known as skinning. Here, a model is bound to an armature of bones that define how parts of the mesh move relative to one another. Each vertex is assigned to one or more bones with a weight totaling a value of 1.0 per vertex. When the skeleton is posed, for example by rotating an arm bone, the vertex positions are computed by blending the transforms from all influencing bones according to their set weights. This skinning can happen on the CPU or GPU, although GPU is preferred for web as it can be very performance heavy.

In practice, skeletal animation performs well for characters or articulated objects, but the cost scales with vertex count and bone influence count. A character with 10.000 vertices skinned to 4 bones per vertex is manageable, but with 50.000 vertices and 8 influencing bones, it can lead to a strain on mobile GPUs. Engines mitigate this by limiting influence counts during exports and reusing skeletal data whenever possible.

Morph Target

For deformations that do not fit a skeletal rig, such as organic shape changes or a muscle flexing, morph target animation is ideal. Morph target animation, also known as blend shapes, store multiple vertex position sets representing different shapes of the same topology. An example for facial animations would be a blend shape for a neutral face, one for a smile and one with an angry frown. Animation is then achieved by blending between these morph targets. This is computationally simpler than skinning as it is just a weighted sum of vertex positions with no hierarchy involved.

Morph targets shine for localized deformations but become expensive with a high vertex count, since every target must be stored in memory and blended per vertex. They are perfect for faces or props like inflating balloons, but less suited for full body animation. In glTF exports from Blender, shape keys become morph targets and Three.js can load them directly for playback.

The Cost of Animation

Both of these two systems rely on keyframe data. Animation clips store tracks of changes, such as rotations and influences, sampled at specific points in time. Playing back these poses involves interpolation between keyframes using mathematical curves. The performance cost is generated by updating the skeleton or morph influences every frame and re-skinning the mesh. For smoother playback, engines like Three.js use an “AnimationMixer” that handles time scaling, looping and pausing. Another way to increase performance is to reduce the keyframe density during exports to cut down memory.

Optimizing animations for the web emphasizes reuse and simplification. Reusing rigs and skeletons across characters, baking simple animations to morph targets or to geometry if they do not need blending. Update rates can also be adjusted to increase performance based on the importance of the animation. Similar to LODs, animation can be reduced when it becomes less important or further away, switching from a 60Hz to a 30Hz update rate at higher distances.

Interactivity

Interactive animation adds a whole new world of challenges such as physics integration or procedural posing / animations. Full inverse kinematics for example are very expensive compared to simple bone manipulations via uniforms. Physics based interactive animations such as cloth simulations are so performance heavy that they should only be used for key objects of a scene.

SOURCES

1: https://github.com/akash-coded/mern/discussions/217
2: https://www.tutorialspoint.com/babylonjs/babylonjs_animations.htm
3: https://doc.babylonjs.com/features/featuresDeepDive/mesh/bonesSkeletons
4: https://firxworx.com/blog/code/creating-an-animated-3d-ecard-using-webgl-react-three-fiber-gltf-models-with-animations/
5: https://dev.to/derrickrichard/unlocking-the-web-in-3d-an-introduction-to-threejs-57dn

Lighting and Shadows in the Browser

Lighting is one of the most important tools for making 3D scenes feel believable. A simple model can look convincing with well-designed lighting, while a high-resolution asset can appear flat without it. In web-based 3D this is no different, but lighting comes with a big caveat, a possibly big hit to performance.
Every extra light and reflection typically translates into additional calculations in shaders, so understanding how lighting is implemented helps developers decide where to spend the performance budget.

Types of Lights

Most real time engines for the web support several types of lights. Directional lights, point lights, spot lights and ambient lights among others. Directional lights represent the most common light source – the sun, with light rays moving parallel to one another. They are often used to define a main light direction for outdoor scenes. Point lights emit light equally in all directions starting from a single point, similar to a light bulb. Spot lights on the other hand emit light in the form of a cone, similar to stage lights. Ambient lights emit lights evenly everywhere, providing a base level of brightness so that shadows are not 100% black. Additionally there are HDRI maps that can be used to simulate real lighting scenarios without the use of a single “physical” light. HDRI maps are most important for reflections and physically based rendering.

How do Lights light?

Lights are implemented in shaders as mathematical models. The vertex or fragment shader takes the light positions, directions and colors, combines them with surface normals and material properties, and computes a lighting contribution at each pixel. For directional lights, this often involves a simple dot product between the light direction and the surface normal. Point and spot lights add distance-based falloff, which are more expensive on performance because of the additional equations. Environment lighting relies on a preprocessed environment texture, which is more costly that a single directional light but can dramatically increase realism.

To add shadows, the renderer needs to determine which parts of the scene are blocked from the light. The most common real-time technique is shadow mapping. In a shadow map pass, the scene is rendered from the light’s point of view into a depth texture, which stores how far each visible point is from the light. Then this map is transformed into the light’s coordinate space and compared do the depth value. If the fragment is farther away then the stored depth, it is considered occluded and rendered in shadow. This technique is widely used in WebGL and other real time APIs as it works with any geometry and doesn’t require a special kind of processing.

For global illumination, many modern engines use Image-Based Lighting (IBL). IBL relies on environment maps (HDRI) that represent the lighting of a full 360 degree environment. For web development, these HDR maps are often converted into specular and diffuse textures that can be applied to the environment to provide both reflections and indirect light.

Because lighting affects performance so much, many real-time pipelines use a mix of baked and dynamic techniques. Baked lighting is a precomputed light interaction that is stored in lightmap textures. These lightmaps are then sampled at runtime, with shaders performing minimal calculations. Dynamic lighting on the other hand, is computed every frame and is necessary for moving objects or lights. A common strategy is to use baked lightmaps for static indirect light and large-scale ambient effects while reserving the performance heavy real-time shadows for characters, moving props or user-driven interactions. Baked lightmaps consume some texture memory but almost no runtime completion, making them a good fit for low end devices such as mobile.

Good lighting design for the web starts with restraint. Often, a single directional light with shadows and an environment map can provide enough richness for product visualization. More complex setups should be justified by clear visual needs, such as interactive environments or game-like experiences. When targeting a wide range of devices, it is wise to provide different lighting tiers depending on the available hardware.

SOURCES

1: https://webglfundamentals.org/webgl/lessons/webgl-shadows.html
2: https://sbcode.net/threejs/environment-maps/
3: https://dev.to/joseph7f/tutorial-building-a-simple-pbr-scene-with-shadows-and-fps-controls-in-threejs-19oj
4: https://star.global/posts/introduction-to-webgl/
5: https://www.chinedufn.com/webgl-shadow-mapping-tutorial/
6: https://pingpoli.de/sparrow-9-shadows
7: https://docs.godotengine.org/en/stable/tutorials/3d/global_illumination/using_lightmap_gi.html

GPU Buffers: How 3D Data Reaches the Screen

When working with WebGL or WebGPU through engines like Three.js or Babylon.js, it is easy to think of models as abstract objects that just make the scenes “appear” on screen. Underneath the hood of these engines, there is however a very concrete flow of data from JavaScript into GPU memory. Understanding how buffers, attributes and uniforms work, helps explain why certain operations are cheap and others can quickly lead to performance issues, especially in complex 3D scenes.

What are Buffers

At the core of GPU data flow are buffer objects, which is a block of memory on the GPU that stores raw data such as vertex positions, normals, texture coordinates or indices. Instead of sending vertex data for every frame, WebGL and WebGPU allow developers to upload this data into a buffer and then reference it many times during rendering. This is critical for performance because communicating with the GPU from JavaScript is pretty expensive compared to the GPU reading data that is already on it.

Most meshes rely on two main types of buffers, vertex buffers and index buffers. A vertex buffer holds attributes for each vertex, such as 3D position, surface normal and UV coordinates. An index buffer holds integer indices that reference those vertices in a specific order, allowing the GPU to reuse vertex data when constructing triangles. For example, a rectangle drawn with two triangles can use four unique vertices but six indices, avoiding duplication in the vertex buffer and reducing memory usage.

Using index buffers becomes increasingly important as meshes grow more complex. Without indices, every triangle must define all three of its vertices independently, even if those vertices are shared with neighboring triangles. With the help of indices, a vertex that belongs to multiple triangles can be stored once inside of a vertex buffer and referenced multiple times from the index buffer.

It also matters how the data is laid out inside of the buffers. Attributes can be stored in an interleaved fashion or in separate buffers. Interleaved buffers pack normal and UV data together for each vertex individually, which often reduces state changes because the GPU can fetch all attributes for a vertex in one swoop. Separate buffers can be beneficial when different passes only need a subset of data or if some attributes change more frequently than others, but they might lead to a larger overhead.

Blocks and UBOs

On top of vertex data, the GPU also needs per-draw and per-material parameters. These include transformation matrices, colors and light properties and are provided through uniforms. Uniforms represent constant values across all vertices or fragments in a single draw call. For example, the model-view-projection matrix, a base color, and a light direction might be sent as uniforms and then read in both the vertex and fragment shaders. As scenes become more and more complex, managing dozens of individual uniforms across multiple shaders can also become a bottleneck. This is where uniform blocks and UBOs (Uniform Buffer Objects) enter the picture. Instead of setting a large number of uniforms one by one, a UBO allows developers to pack related uniform data (for example all lighting parameters) into a dedicated buffer on the GPU. Then, multiple programs can then share that UBO which drastically reduces the number of calls needed to update data each frame. WebGL and WebGPU both support this pattern, and real-world projects use it to centralize camera and lighting information for many draw calls.

Attribute layouts, strides and offsets control how the GPU interprets data inside of a vertex buffer. When setting up attributes, the number of components each attribute has, the stride between consecutive vertices and the offset of each attribute within the vertex structure is determined. This is vital as a single mistake in stride or offset can produce corrupted geometry. Once attribute bindings are configured, they are often stored in Vertex Array Objects (VAO), making it possible to re-bind all attribute and index changes with a single draw call.

Static and Dynamic Data

From a performance standpoint, the important distinction for data is between static and dynamic data. Static geometry, such as the environment, should be uploaded once and reused across frames, with buffers created with specific notations for a static element. Dynamic geometry on the other hand, such as particle systems, may require buffer updates every frame, which is more expensive. In these cases, careful strategies like updating only parts of a buffer or offloading some updates to the GPU with compute or transform feedback can help keep performance in check.

SOURCES

1: https://learnwebgl.brown37.net/rendering/buffer_object_primer.html
2: https://www.geeksforgeeks.org/javascript/how-to-create-and-use-buffers-in-webgl/
3: https://www.siltutorials.com/opentkbasics/4
4: https://webgpufundamentals.org/webgpu/lessons/webgpu-vertex-buffers.html
5: https://webgl2fundamentals.org/webgl/lessons/webgl2-whats-new.html
6: https://webglfundamentals.org/webgl/lessons/webgl-how-it-works.html

Shaders: Balancing Quality and Cost

In real-time 3D graphics, shaders are where most of the visual magic happens. They control how geometry is transformed, how lights interact with surfaces and finally, what every pixel on the screen is colored. At the same time, shaders are also one of the easiest ways to accidentally destroy performance. Writing efficient shaders for WebGL or WebGPU means understanding what work is done where, and the effect of small choices, when they are scaled up across millions of pixels.

How do they work?

There are two core shader stages, that matter most in web-based 3D, the vertex shader and the fragment shader, also called the pixel shader. The vertex shader runs once per vertex, transforming positions from object space into clip space and preparing any per-vertex data that needs to be passed along, such as normals or texture coordinates. The fragment shader runs for every pixel that is covered by a single triangle and is responsible for computing the final image that can be seen on the screen. It does this by combining textures, lighting and material properties. Because fragment shaders execute once for each visible pixel, they usually need to run for almost every pixel every frame. This is often about 100 times more than vertex shaders. For this reason, most of the work is pushed onto the vertex stage and letting the GPU interpolate the values instead of computing heavy operations for each pixel.

Shader complexity matters, as every extra operation (at least in fragment shaders) multiplies across every single visible pixel. Per-pixel lighting calculations, multiple texture look ups and mathematical expressions add up and decrease performance. Techniques like physically based shading, soft shadows and screen-space effects can be visually impressive, but implemented incorrectly, they can easily overwhelm weaker GPUs. Thus keeping fragment shaders simple and avoiding unnecessary work is crucial to achieve high framerates on the web.

Light Baking

One of the most effective strategies to balance visual quality and performance is to implement baked lighting whenever possible. Instead of computing complex lighting setups or dynamic lights in the shader at runtime, lighting can be pre-computed into lightmaps or baked textures using special lightmap bakers. These lightmaps are then sampled in relatively simple fragment shaders, giving the appearance of detailed and realistic lighting without the cost of real-time light rendering. This approach is especially useful for static environments, where lights and geometry do not change.

Dynamic Lighting

Dynamic lighting is often used when objects or lights need to move or respond to interaction. However, every dynamic light contributes to per-pixel shading further increasing the workload of the fragment shaders. Many real-time engines impose limits on how many lights can affect a single object, or use approximations like clustered shading to keep the process simple. In web-based 3D, a baked base lighting solution and a small number of carefully chosen dynamic lights are often combined to save on performance. This still enables the users to get real time light changes through the dynamic lights for specific use cases such as moving objects or user feedback, and decrease the load on the GPU.

Branching

Another factor that can significantly affect performance is branching. Branching is the use of if/else statements inside the code. The GPU always calculates every single branch possibility and then only discards the unused results. Doing this for every single pixel can be draining on the performance even though modern hardware handles some branching pretty effectively. For example, branches based on uniforms, where every pixel makes the same choice, tend to be much cheaper than branches that are based on per-pixel values. Because of this, it is often better to replace branches with cheaper operations whenever possible. For example, instead of using a complex if tree that selects many shading modes, separate shader variants can be used. In some cases, using mathematical blends can approximate conditional behavior without loosing performance due to branching.

SOURCES

1: https://webglfundamentals.org/webgl/lessons/webgl-fundamentals.html
2: https://web.dev/articles/webgl-fundamentals
3: https://developer.mozilla.org/en-US/docs/Web/API/WebGL_API/WebGL_best_practices
4: https://star.global/posts/introduction-to-webgl/

Draw Calls: The Invisible Bottleneck

Building performant 3D experiences on the web requires understanding how browsers, GPUs, and JavaScript interact. Even with optimized models and textures, poor draw call management causes stuttering.

What is a Draw Dall and why is it Important?

A draw call is the communication between the CPU and the GPU, more like single commands from the CPU saying “make this” or “draw this”. Each visible mesh generates one draw call. When issuing a draw call, the CPU prepares render state, binding vertex buffers, setting shaders, configuring textures, and managing memory. GPUs themselves are extremely efficient, rendering the triangles that make up models almost in an instant, but CPUs often cannot handle that much information, especially in such short time. Every draw call between creates a communication overhead, basically a cost required to make the communication between CPU and GPU happen. And if there are too many draw calls, the CPU is overwhelmed by the amount of data while the GPU sits there, doing nothing and waiting for instructions from the CPU.

This is why the resolution of a model does not matter as much as draw call count. A mesh with 200.000 triangles could render smoothly while 200 small meshes with 1.000 triangles each could overload the CPU leading to stuttering due to the overhead. Three.js projects usually maintain 60fps with around 100 draw calls per frame and at 500+ calls, even powerful hardware starts to struggle.

By focusing on draw calls, web developers can fix many performance issues that are not obvious from looking at mesh density or material count alone. Keeping the number of calls low through these steps ensures that the CPU can keep up with the GPU, resulting in smoother interaction and a more responsive 3D experience.

How to Reduce Draw Calls?

Merging

One of the most effective optimization methods is to merge static geometry. The objects in the environments that do not need to move, for example pieces of a building, such as floor tiles, wall segments, furniture can often be combined into a single larger mesh. This simple step turns many small draw calls into one large one. Even though the total amount of information has not changed, the scene will run much smoother as the communication overhead only needs to happen once for the combined mesh instead of once for each of the individual pieces.

The only drawback of this method is, that these parts need to be fully static, so it is not a good method for pieces that need to move individually or that can be interacted with. After merging only the whole merged mesh can be transformed, not the smaller parts of it.

Instanced Mesh

Another powerful tool is instancing. If the scene features 200 small meshes for example that are identical, these meshes can be instanced instead of duplicated. This allows the CPU to only send a single draw call, with the GPU handling the positioning of the object afterwards. This technique is ideal for repeated objects like trees, chairs, street lamps, bolts, and many more that share the same mesh and material but appear in different positions and rotations. A real estate visualization demo reduced draw calls from 9000 to 300 by converting chairs and props to instances, improving performance from 20 to 60 frames per second.

Batched Mesh

When focusing on draw calls, not only meshes are important, materials and textures are too. Every time the renderer needs to switch materials, it disrupts batching and usually triggers a new draw call. Sharing materials across meshes and using texture atlases where possible can help keep the draw calls lower. For example, several props that could be represented with a single atlas can be drawn together using the same material, with the UVs selecting the appropriate part of the texture for each object. This reduces both material state changes and draw call counts, especially in engines like Three.js that can batch geometry sharing a material, enabling them to combine multiple different geometries that share a single material into a single draw call.

Vision

Another reduction method that is often forgotten is on the visibility side through techniques like frustum culling. Most engines automatically skip objects that are not visible to the camera’s view frustum (the are that is currently visible to the camera) but manually culling or grouping specific objects together can help reduce calls. For example, hiding entire sections of a scene when the user is in a different area. This is especially useful in large scenes with different rooms or zones that the user cannot see all at once.

SOURCES

https://www.utsubo.com/blog/threejs-best-practices-100-tips
https://velasquezdaniel.com/blog/rendering-100k-spheres-instantianing-and-draw-calls/
https://stackoverflow.com/questions/41783047/how-many-webgl-draw-calls-does-three-js-make-for-a-given-number-of-geometries-ma
https://discourse.threejs.org/t/three-js-instancing-how-does-it-work/32664

Integration of 3D Models on the Web p.03

Texture Optimization

In modern 3D graphics, texture management plays a major effect on the performance. High-quality textures make scenes look realistic, but they can easily overload memory and slow rendering. To handle this challenge efficiently, new texture formats and optimization techniques like KTX2, Basis Universal, channel packing, atlasing, and mipmapping are increasingly used across both games and web experiences.

The KTX2 Format

Modern 3D workflows require efficient, cross-platform texture formats. That’s where KTX2 (Khronos Texture 2.0) comes in. Designed for modern graphics APIs like Vulkan, OpenGL, and WebGPU, the KTX2 format has become a standard for next-generation texture pipelines.

One of its standout features is Basis Universal supercompression, a technology developed by Google and Binomial. It stores textures in highly compressed intermediate formats (ETC1S and UASTC), which can be converted directly to GPU-native formats at runtime. This approach eliminates the need to maintain separate texture sets for different platforms, saving both time and storage space.

Another key feature of the KTX2 Format, is the Data Format Descriptor (DFD) system. It provides detailed metadata about compression parameters. This metadata allows textures to automatically be detected ensuring smooth integration with modern graphics pipelines. KTX2 also supports a wide range of advanced texture types such as arrays, cubemaps and 3D textures. This makes the format highly flexible for complex rendering workflows.

Basis Universal

Basis was developed by Google and Binomial in 2019 and aims to make texture data more efficient across different platforms. The basis format is typically 6-8 times smaller than jpeg, with less strain on the GPU and also smaller filesize. This makes it ideal for gaming, AR/VR, and of course, web based 3D. The main selling point of Basis Universal though, is its cross-platform efficiency as it supports fast decoding across devices which drastically reduces bandwidth and memory requirements.

Texture Optimization Techniques

Efficient texture management goes beyond compression. There are many tricks, artists use to optimize their textures for the web/in general. These techniques help balance quality and performance.

Channel Packing

Channel packing combines different texture maps into the different RGB channels of a single image. So a single image file could hold multiple texture maps such as, for example; roughness maps, metallic maps, etc. This alleviates the stress on bandwidth by quite a bit, as the technique saves up to four times the texture space and is also simple to set up. This method is most frequently used in game development, where VRAM is often an issue.

Atlasing

A texture atlas combines many smaller textures into one large image. This reduces the number of draw calls and texture switches during rendering, significantly boosting performance. Texture atlases are often used in game engines to improve frame rates, reduce memory overhead, and speed up loading times resulting in smoother gameplay and a more responsive experience.

Mipmapping

Mipmapping creates a chain of lower‑resolution versions of a texture that are automatically selected by the GPU based on the viewer’s distance. This basically works very similar to the LODs that I talked about in the “how can 3D designers optimize models”. Whenever a 3D object moves away from the camera, the system switches to a smaller mipmap level to reduce aliasing and improve performance. While mipmapped textures require about 33% more memory, they reduce bandwidth usage and improve cache efficiency, making them vital for real‑time rendering. Besides performance gains, mipmapping also enhances visual quality by preventing flickering and shimmering on distant surfaces.

SOURCES

1: https://pixijs.com/8.x/guides/components/assets/compressed-textures
2: https://dev.to/himj266/delving-into-the-world-of-3d-web-from-webgl-to-threejs-and-react-three-fiber-23kh
3: https://opensource.googleblog.com/2021/02/basis-universal-textures.html
4: https://blenderartists.org/t/guide-texture-optimisation-channel-packing/1227744
5: https://garagefarm.net/blog/texture-atlas-optimizing-textures-in-3d-renderinghttps://developer.android.com/games/optimize/textures

Integration of 3D Models on the Web p.02

3D Model Formats and Web Optimization

In web-based 3D visualization, file format plays a big role, impacting performance, compatibility and efficiency in the workflow. That is why choosing the wrong file format can be catastrophic for the project, increasing load times, putting a lot of strain on system resources and creating incompatibilities with software tools. Apart from the standard 3D file formats such as obj and fbx, there are formats specifically designed for usage in game development and the web. Those two are glTF and GLB. Both of these serve as containers for 3D models but they differ in use cases.

glTF

glTF (Graphics Library Transmission Format) is a text-based, JSON(JavaScript Object Notation)-encoded standard specifically designed for the efficient transmission of 3D scenes and models. The text-based nature of the file enables humans to be able to read it and thus, be able to easily edit and debug the files. This transparency is especially advantageous during development, as that is the stage where small adjustments can be made directly in the file instead of having additional editing steps.

Compared to GLB, glTF produces a slightly higher file size as it relies on JSON. However, the modularity glTFs provide allow developers to reference external assets such as textures and animations. This flexibility makes glTF very suitable for large projects that reuse assets across multiple scenes. The increased file size needs to be accounted for when planning such a project, but this drawback is often outweighed by the ease of customization within these big projects. This is why glTF is often chosen for complex web applications that need more flexibility with updates.

GLB

GLB represents the binary version of the glTF file format. It combines all the model data (geometry, materials, textures and animations) into a single binary file. This structure enhances machine readability and thus, significantly improves loading time. Browsers can read the files directly instead of needing to interpret the JSON text.

This is why the GLB is typically smaller and loads faster, leading to a big advantage in environments that require high performance such as augmented reality applications. The unified structure of the GLB also simplifies file management, since everything is embedded into a single file. This unification reduces the risk of textures going missing or references being mismatched.

Requirements for Web Based 3D

With the knowledge of the different methods how 3D environments can be rendered on the web and the special file formats for 3D files, creating these web based 3D applications comes with additional platform specific requirements. For example, even though WebGPU represents the future of browser based graphics, it is currently limited to a certain set of browsers and computers. Mobile browsers for example do not have WebGPU support, which is why WebGL is still used so much today. Optimizing for mobile ensures that performance stays stable and responsive interactions are maintained, even under constrained resources. Another limiting factor is bandwidth, as large files can become bottlenecks for load time, especially on slower network connections. That is why file compression and small file sizes are so important in web development in general.

3D Model Optimization

Effective 3D model optimization is extremely important in web design. Unoptimized assets can severely reduce performance regardless of hardware or bandwidth availability. Assets that have been optimized have much faster load times, reduced bandwidth usage and improved user interaction. Smaller models are also easier to animate and integrate.

An important concept in model optimizations is LOD (Level of Detail). The same object often has several LODs, that represent the models complexity based on the distance of the viewer. For example when the camera is within 10 meters of the model, the full resolution is shown. But at 10-50m the full resolution model is replaced by a simplified version with, for example, 50% less polygons. Sometimes the reduction in LOD goes so far as to replace the whole model with a static image at great distances. The distances and transitions between LODs have to be chosen very carefully though as to avoid loading artifacts or noticeable changes in detail.

Simplifying the geometry is another major optimization technique. It is also needed for LODs, but the full resolution model for example should still be as optimized as possible. Mesh simplification tools can automatically remove unnecessary vertices and faces that might be duplicates or not even visible to the camera. Manual retopology is another very powerful but time extensive method that allows artists to craft low poly versions of the models.

SOURCES

1: https://visody.com/this-is-what-you-need-to-know-about-gltf-3d-model
2: https://resources.imagine.io/blog/gltf-vs-glb-which-format-is-right-for-your-3d-projects
3: https://ikarus3d.com/media/3d-blog/glb-and-gltf-files-purpose-difference-and-area-of-application-in-3d-modeling-services
4: https://www.sloyd.ai/blog/how-to-optimize-3d-models-for-real-time-generation
5: https://mazingxr.com/en/glb-vs-gltf/
6: https://blog.pixelfreestudio.com/how-to-optimize-webgl-for-high-performance-3d-graphics/

3d headphones on a website

Integration of 3D Models on the Web p.01

The integration of 3D-models, -visual effects and -interactive graphics into websites has evolved from a once niche application into a powerful tool. In the past century, this technical challenge turned into a widespread practice, used by many digital marketplaces to preview products. In recent years especially, the advances of browser-based graphics have transformed the way digital content is experienced. Today, whole games can be developed and played inside of a browser. Something that was unthinkable just a few years ago.

The Technical Foundation: WebGL and WebGPU

WebGL (Web Graphics Library) has served as the cornerstone technology enabling 3D graphics in browsers since its release in 2011. It is a JavaScript API (Application Programming Interface) that’s based on the OpenGL family of APIs. With the use of WebGL, developers are able to render 3D and 2D graphics directly inside of the browser without the need for additional plugins. By providing direct access to the systems GPU (Graphics Processing Unit), WebGL supports hardware acceleration for rendering which significantly improves visual performance. This allows developers to implement realistic lighting, detailed textures and dynamic animations that would otherwise be very CPU (Central Processing Unit) intensive. With efficient GPU utilization, WebGL supports advanced visuals such as reflections, shadows and particle systems.

As time passed and GPU technology continued to developed, demands for higher performance and better visuals grew. This advancement lead to the introduction of WebGPU in 2023. It is built with modern GPU APIs such as Direct3D 12, Metal and Vulkan which lets it more efficiently communicate with the new hardware systems. This significantly increased performance and enabled new possibilities for developers.

Benchmarks between the two technologies showed a drastic improvements regarding performance. An example would be a metaball demo that ran at 8 FPS on WebGL which WebGPU handled easily with a Frame rate of 60 which is almost a 10x improvement over the old technology.
WebGPUs architecture mirrors modern native GPU programming practices as it offloads most of the rendering directly to the GPU. This way the browsers main JavaScript thread is free to be able to handle user interactions etc. resulting in smoother and more responsive experiences.

The Technical Foundation: High-Level Frameworks

While APIs like WebGL and WebGPU provide the low-level interface to GPU hardware, using them directly requires vast knowledge in graphics programming and massive amounts of code to run even the most basic tasks. As this is a very time intensive tasks, a variety of high-level frameworks have emerged that simplify the process and enable developers to focus on design instead of programming.

Three.js

Probably the most widely used framework for creating 3D web applications is Three.js. It is build on top of WebGL and offers a simplified approach to 3D graphics within the browser and it is open-source.

Three.js itself uses a system that organizes 3D scenes through a well structured hierarchy known as a scene graph. This manages the relationships among the elements in a scene such as cameras, lights, meshes and models.

Three.js is made up of the renderer, which enables the viewer to see the objects, lights, etc. placed into the scene. The scene is made up of all the objects, such as lights, camera and meshes. Then there is geometry, which are the individual vertexes of the objects and materials, which represent the surface properties of the objects. Meshes are just a combination of both materials and geometry. Textures are images used by the materials to represent the surface properties and finally light, which is used to light up the scene, to be able to see the meshes.

With this hierarchy, Three.js simplifies the developing of interactive 3D visualizations and animations for the web.

Babylon.js

Another powerful framework is Babylon.js, a real time 3D render engine that was originally developed in TypeScript and was compiled to JavaScript to ensure browser compatibility. Babylon.js is designed for large-scale interactive applications and supports a wide array of use cases such as virtual worlds and educational platforms.

Something that sets Babylon.js apart is its comprehensive and well documented ecosystem that includes an interactive playground for testing and experimenting. The engine includes advanced features such as post-processing effects and Gizmos (tool for real time manipulation). These tools make Babylon.js a particularly powerful tool in the hands of a developer for complex interactive environments that require flexible user interaction.

Frameworks like Three.js and Babylon.js bridge the gap between GPU-level programming and high-level web development, enabling designers and programmers to integrate interactive 3D experiences seamlessly into web applications.

SOURCES

1: https://www.mongeyplunkettmotors.ie/2025/08/30/how-webgl-powers-engaging-browser-games-today/
2: https://dev.to/himj266/delving-into-the-world-of-3d-web-from-webgl-to-threejs-and-react-three-fiber-23kh
3: https://developer.chrome.com/blog/webgpu-io2023
4: https://texturecompression.com/blog/ktx2-format-guide

Textures and their optimization in games

In 3D graphics, textures are an essential tool for artists to portray their worlds and stories. In the early days, this did not only come with the complexity of having textures visualize information in three-dimensional space, but also hardware restriction, as textures tend to be on the larger side regarding file size when compared to other files used in games and computer graphics. This chapter focuses on how artists and engineers mastered using textures and what workarounds they used for optimization.

What are textures and how are they used?

The first thing to clarify, when talking about textures is, what are textures? Specifically in 3D computer graphics, a texture is a 2D image, that “wraps” around the surface of the 3D model, adding more detail to the mesh that do not have to be sculpted such as woven cloth, increasing the visual fidelity of the 3D model without much of a performance decrease.
The textures are basically wrapped around the 3D object in a similar manner to very elaborate Christmas present wrapping. Of course, it is important how complex the geometry is, that the texture is supposed to wrap around, as a cube is much easier to wrap than a moped.

Instead of wrapping the 2D image around the object, for textures to be displayed on the 3D object, the geometry itself needs to be cut up into two-dimensional shapes. A very easy visual to try to imagine this process is the way a cube would be unwrapped.

This process is called UV Mapping or UV Unwrapping. The term UV is abbreviated from the 2D matrix it is based on where U are the rows and V are the columns.

The Material of an object is usually made up of multiple maps that each use a texture. For example the Albedo Map or sometimes called Diffuse Map, also known as the base colour, represents the raw colours of the object, for example the shades of red and white in the Christmas wrapping paper. Depending on what rendering workflows are used, different types of maps are needed in order to create an objects visuals. Staying with the wrapping paper example, another map that is needed is the roughness or glossiness map. This map affects how light interacts with the surface, or how shiny the object is going to look. A mirror for example has a very low roughness, whereas a cushion would require a much higher roughness map. Other maps include normal maps, metallic maps, ambient occlusion maps and height/displacement maps.

For the texture creation, often times tools like Substance 3D Painter, Substance 3D Designer or ZBrush are used as they offer many great tools such as individual workflows for procedural texture generation, simple drawing and editing or even modelling surface imperfections.

Why is it important to optimize textures in games?

As games run in real time, there is a limiting factor of computing power that is required to enable the game to run smooth. Most of the heavy lifting is done by the VRAM (Video Random Access Memory) that stores most resources required for rendering such as textures, meshes, etc. It is the memory of the GPU (Graphics Processing Unit) and it is often the limiting factor that computer graphics run into when wanting to achieve performance. Additionally, with the mobile and computer market, the uncertainty that all computers could have a different graphics card is a major factor as companies don’t only need to optimize for a single type of GPU but for a broad bandwidth of VRAM. Textures are usually among the most resource-intensive elements, which is why it is very important to optimize them as much as possible.

Comparison of two graphics cards

How can textures be optimized for 3D games?

Before beginning to optimize textures, let’s first look at a parameter to see how draining a texture is: the cost of a texture. As mentioned before, any given graphics card has a limited amount of VRAM space. Modern day graphics cards range from 2GB to 8GB of VRAM, and every single pixel that needs to be sent to it has a cost regarding memory. To determine the cost of a texture there are two main factors that are relevant. The textures dimensions, so how large the texture is, and its bit depth, which is the amount of colours that are included in the image. For example, an 8-bit image uses 8 bits per color channel producing up to 16.7 million different colours whereas a 16-bit image can use 16 bits per channel resulting in almost 300 trillion different shades of colour.

simplification of the difference between 8-bit and 16-bit images

Now to figure out how any given texture costs, the pixel count and the bit depth need to be multiplied together. So a 2048×2048 texture with a 8-bit colour space would be the pixel count, so 2048×2048 which is 4,194,304 pixels multiplied by the number of bits every pixel has. As the 8-bit colour space has 3 colour channels with 8 bits each, any given pixel has the bit-depth of 24. So we just need to multiply 4,194,304 with 24 to get 100,663,296 bits. Any given bit is made up of 8 individual bytes so we have to divide the result by 8. Finishing our calculation, our textures size would be 12,582,912 bytes or exactly 12MB.

It is important to keep in mind that the cost for the GPU is not the same as the file size of the image!

This one texture itself doesn’t really seem to pose a problem, but as already explained, objects in games often have multiple textures to represent the full material. So a basic object can have up to six maps (colour, normal, metallic, roughness, ambient occlusion, height). If every map uses a 2K (2048×2048) texture, the total load for the one object would already be 72MB.

Some of the easiest optimization regarding textures is the resolution of an image. If we reduce the resolution from 2K to 1K for example, the cost of the texture would be reduced to 3MB. Halving the resolution of an image results in 75% less GPU load. So it is important to keep in mind how large the object is going to be visible for the player.

example of different texture sizes on the same object

SOURCES

1: https://www.lenovo.com/us/en/glossary/texture-mapping
2: https://playgama.com/blog/general/mastering-texture-and-sprite-techniques-for-stunning-visuals/
3: https://www.adobe.com/products/substance3d/discover/how-to-create-3d-textures.html
4: https://ieeexplore.ieee.org/abstract/document/10311399
5: https://www.proceduralpixels.com/blog/vram-bandwidth-and-its-big-role-in-optimization
6: https://forum.game-guru.com/thread/222504
7: https://www.theledstudio.co.uk/blog/colour-bit-depth-and-grayscale
8: https://www.tourboxtech.com/en/news/bit-depth-explained.html