Okay, this was the session I’d been looking forward to since I started. Modelling was interesting, sculpting was a struggle, but giving my character actual color? That’s the kind of thing that makes it start to feel real.
And it delivered. This was by far the most enjoyable session so far.
A Few Things I Didn’t Know Blender Could Do
Right at the start of the tutorial I learned something completely unrelated to what we were actually doing, but useful enough that I want to write it down anyway. Blender has built-in presets for HDR maps. I had no idea. In the past I always downloaded them from Polyhaven whenever I needed one, which is fine, but knowing there are presets already sitting in Blender is the kind of thing that saves time on smaller projects where you just want to quickly preview how something looks under an HDR environment. Not needed for this project specifically, but definitely filing that away.
Color Space and Why It Actually Matters
Before touching any materials, Patata School explained something I’d never really thought about before: color space. By default, Blender uses AgX as its viewport color transform. AgX is designed to handle high dynamic range rendering in a more filmic, photorealistic way, which makes colors look richer and more complex. The thing is, for cel shading, that’s actually a problem. AgX processes and remaps colors in a way that can shift your shading tones away from what you actually set, which means the carefully chosen highlights, midtones and shadows you defined in your material don’t come out looking quite right in the viewport. Switching to Standard color space disables that processing and shows colors more directly as they are, which gives you much more predictable and accurate results when working with stylized, flat shading. I tested both and the difference was noticeable. Standard was clearly the right call here.
Setting Up the Cel Shading
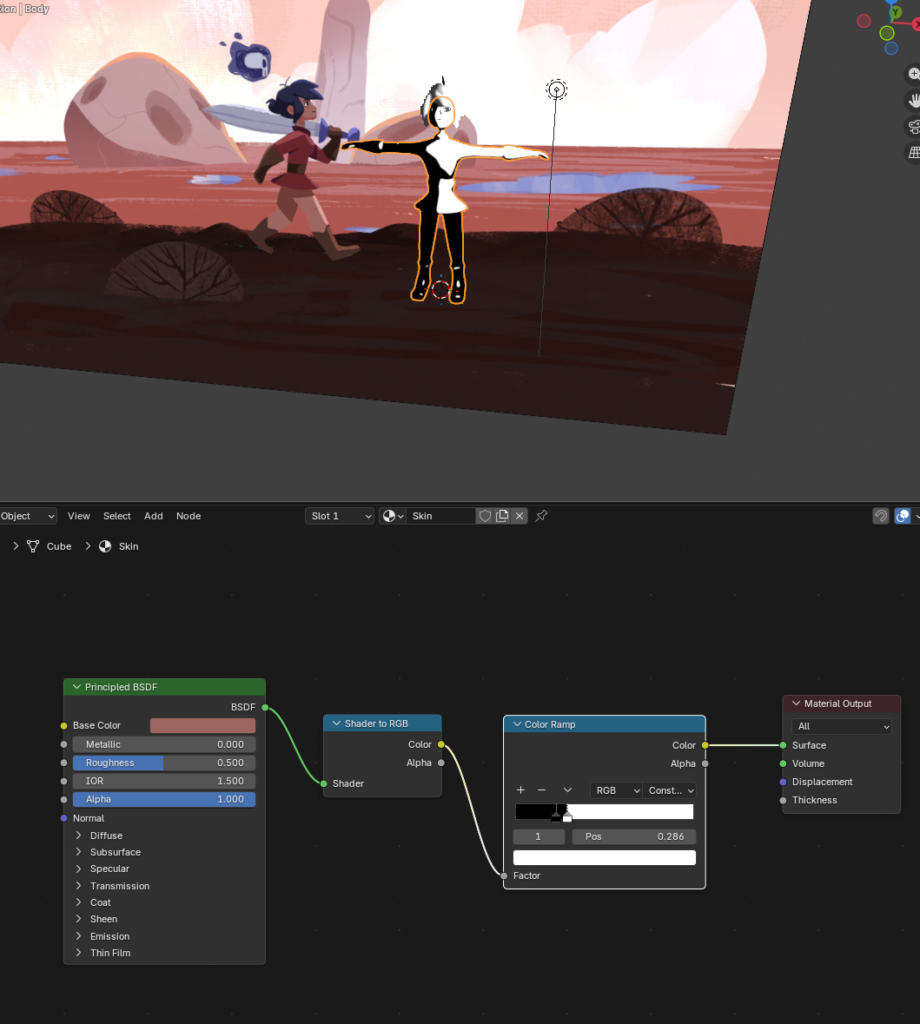
This is where things got genuinely interesting. To achieve the cel shaded look, you build a material in the Shader Editor using a specific node setup. The core of it is a Color Ramp node, which lets you define exactly how light behaves across the surface of your model by setting distinct color stops for the highlight, midtone and shadow areas. Instead of a smooth gradient from light to dark like you’d get with a standard material, the Color Ramp lets you create sharp, defined bands of color, which is what gives cel shading its characteristic flat, illustrative look.
To drive that Color Ramp, you feed it the output of a Shader to RGB node, which converts the lighting information from Blender’s rendering engine into a color value that the Color Ramp can then remap. This is the part I’ll be honest about: I don’t fully understand why the Shader to RGB node works the way it does at a technical level. The tutorial explained it and I followed along, but some of the underlying logic is still a bit opaque to me. What I do understand is that without it, the Color Ramp has nothing to remap, so the whole setup falls apart. Sometimes you just have to accept that a thing works before you fully understand why it works.
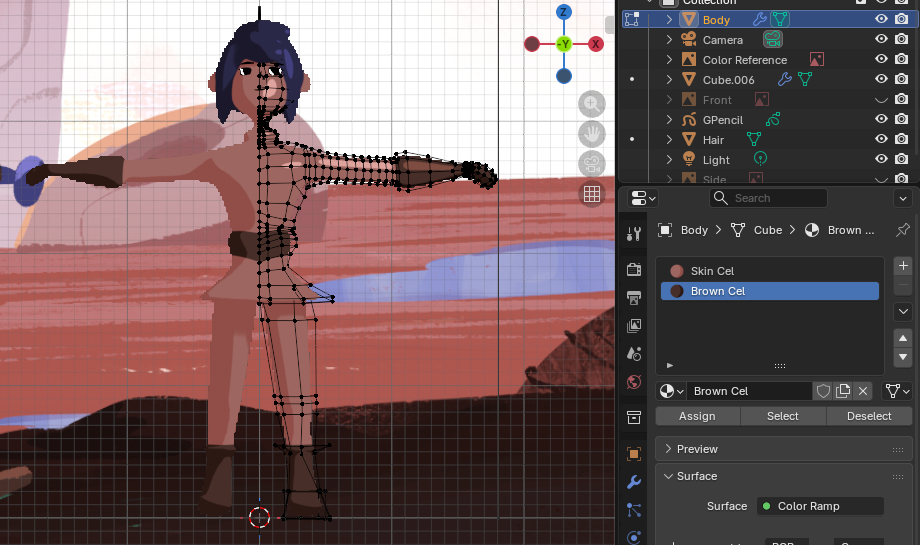
Once the skin material was set up, the rest was straightforward. I duplicated the material, swapped the colors in the Color Ramp to match the other parts of the character, and assigned each material to the relevant faces on the model. The really practical upside of this approach is that every material has its own highlight, midtone and shadow colors that you can adjust independently. If you want the clothing to have a cooler shadow tone than the skin, you just change it in that material without affecting anything else.
One thing that saved me a lot of frustration: if you lose your face selection after assigning a material, you don’t have to reselect everything manually. There’s a Select button right in the material tab that reselects all faces assigned to that material instantly. I cannot count how many times in the past I did this the hard way without knowing that existed.
One Thing to Keep in Mind Going Forward
The session was mostly smooth, but one thing became clear pretty quickly: assigning materials to specific parts of a mesh is significantly easier when the mesh is clean and well-structured. Selecting the right faces in a chaotic or dense mesh is genuinely annoying, and my model was noticeably more complex than the one in the tutorial. Something I noticed a bit too late, and something I’ll think about much earlier next time.
But overall? Best session yet. The character is starting to look like something.
See ya!
