Product/Business Idea

What problem are you solving? Externalizing one’s own internal proprioception and bodily and spatial awareness is not easy, and varies from person to person depending on their mental model.  

Why should we care about it? Through sports (specifically aerial silks, in this case), people get adrenaline, maintain good physical and mental well-being, and create community. However, there is a barrier to entry in the fact that people believe it’s harder and less safe than it actually is, leading to people potentially not finding a hobby that could bring them joy. 

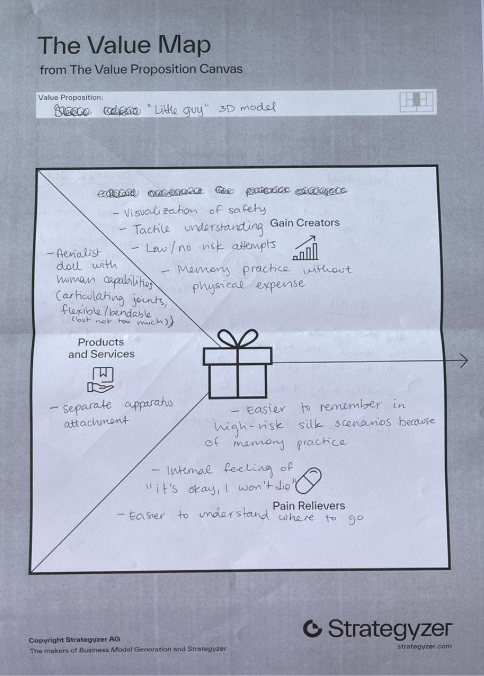
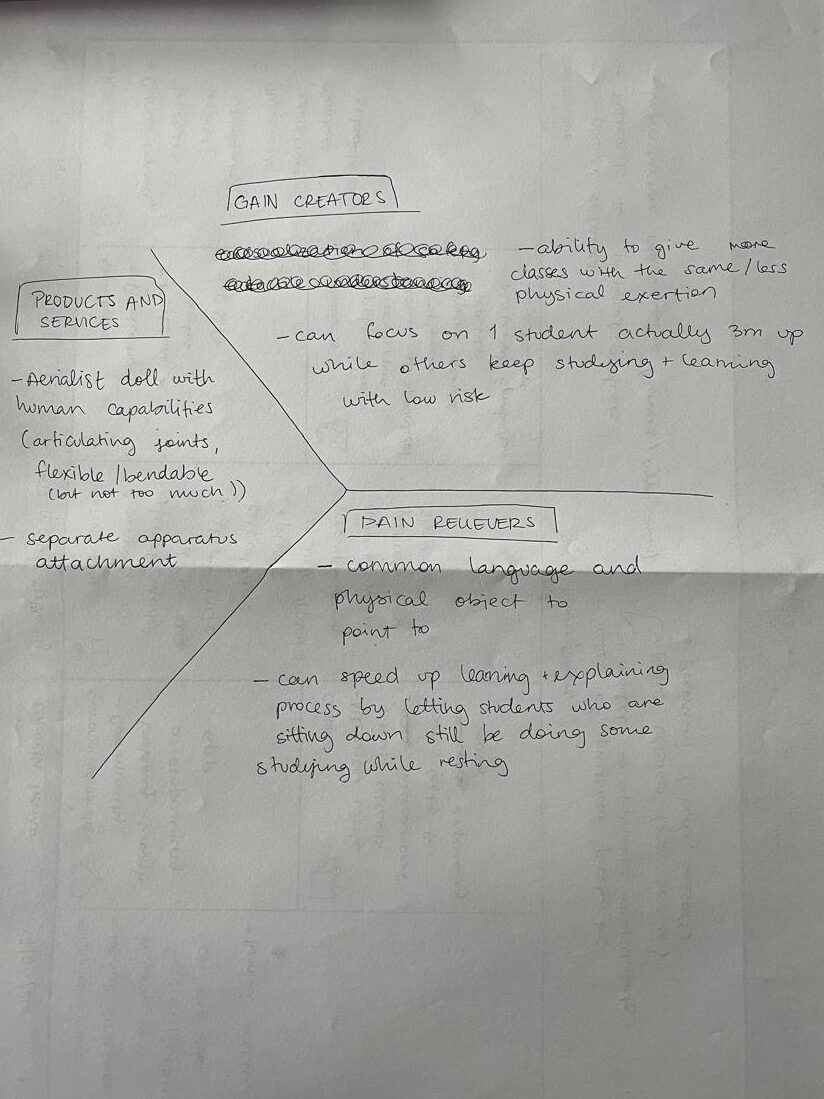
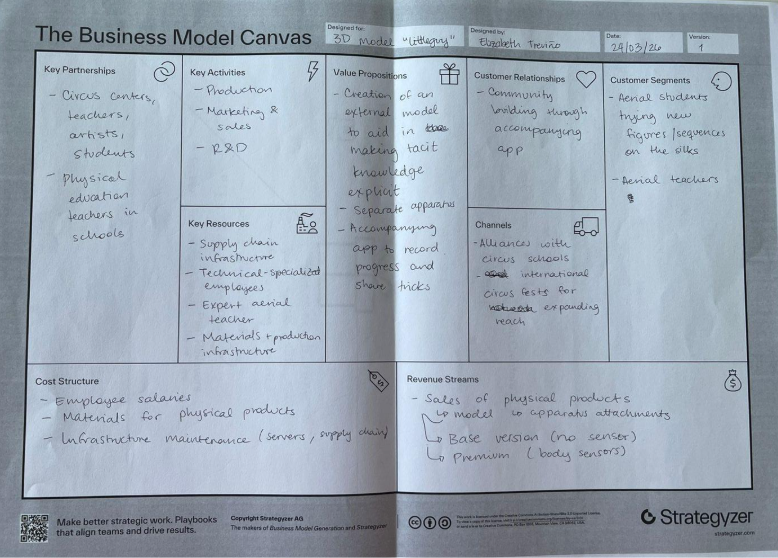
What is the solution you are offering? How does it work? I am offering an aerial silks teaching kit including colorful sleeves and a physical 3D model of a human, which has articulating joints and an additional apparatus add-on (starting with aerial silks). This model would have the possibility of demonstrating aerial silks figures on a smaller scale and with lower stakes. Plus, a premium model would have digital capabilities, with sensors embedded in the sleeves to track the person’s movements and be able to represent it autonomously in the model. This kit would also come with an accompanying app that will function as a personal digital aerial diary to log and track your own progress and create community. 

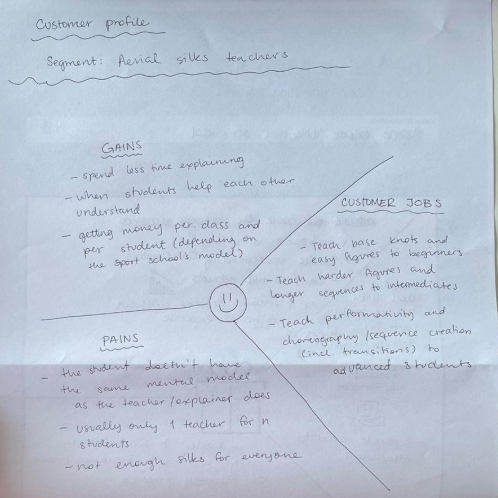
Who is the target audience? Who is the customer? The target audience is the aerial silks student who wants to learn new figures. However, the customer is both the student and also the aerial silks teacher that wants to be able to explain in more classes without having to expense copious amounts of physical energy. 

What is going to happen? (Change & Impact) Aerial students will be able to have more mental security that they will be safe trying out a specific new figure. They will get a deeper understanding for their own body and spatial awareness. The learning curve of new tricks will be lesser, making students able to learn and retain information quicker. Students will be able to, on their own, see if a figure is appropriate for their level, decipher individual moves, try it out in a low-stakes environment, and identify which points have to be taken more care of in order to be safe (e.g. detect essential and nonessential parts of a figure). 

—  

Source:  

Own ideation  
Customer Profiles, Value Proposition Map, and Business Model Canvas 

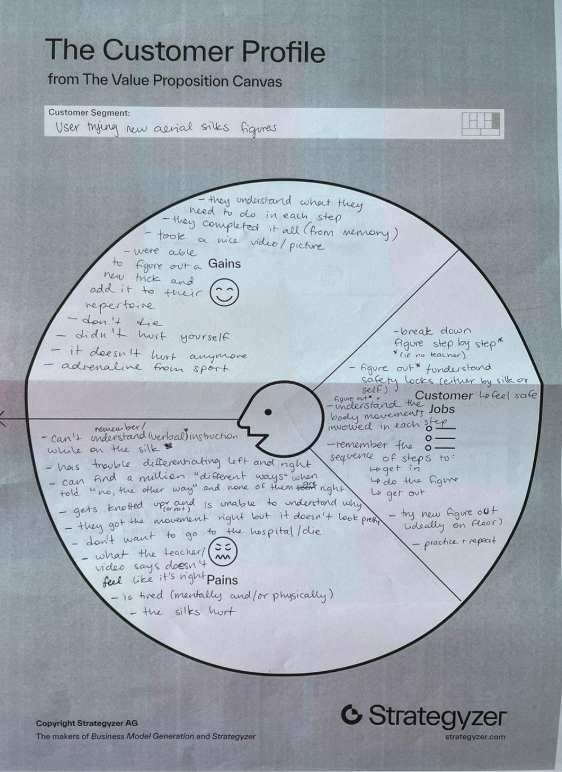
The following are representations of the 2 customer profiles, the value proposition map, and the business model canvas of my prototype. 

Own image. 

Own image. 

Own image. 

Own image. 

Own image. 

Through this exercise, I realized the possibility of expanding my low-level prototype into a digital tool and environment. It would be interesting to explore how a tailor-made app can elevate the experience of using my tool and learning aerial silks, working as a sort of personal diary to log your learnings and new tricks (in progress/mastered) and create community for aerialists from all over the world to help each other. Not only that, but sensors could be added to the wearable sleeves that could communicate with a “premium” (premium because it would have digital capabilities besides his analog ones) version of the 3D little guy aerialist to observe what an aerialist did that was wrong/right.  

—  

Source:  

Own ideation  

My rigging journey 2 – Once upon a ball

I spent around 3 hours of my tutorial with learning basic constraints. I have used quite a few of them in the past and therefore I only listened to it as a reminder. I also feel like I learn it better when I actually see them used in a real example.

Constraints such as: (sourse 250 page documentation of the course)

The clamp to constraints forces a bone location to stick to a selected curve.
The damped track axis makes the owner targeting (aiming) at a target.
The Locked track allows the owner to aim at a target but limits its rotation to only one axis.
The stretch to constraint allows the owner to aim at a target, and alsochanges its length and width based on the target distance.
The track to constraint is great for cameras.
The Copy location constraint forces its owner to have the same location as its target.
The Copy rotation constraint, as all the other transform constraints, uses world space to world space by default. The owner gets the same orientation as the target.

Then it was time for my first rig.

I began where everyone begins. With a basic ball. Everything was still quite simple, however I don’t think I ever did a good working squash and stretch. The main focus of this lecture was to get into good habits. As an example, renaming your bones as soon as you create them by pressing F2.

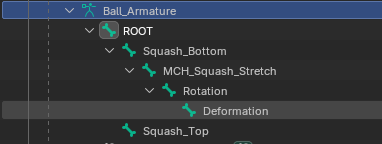
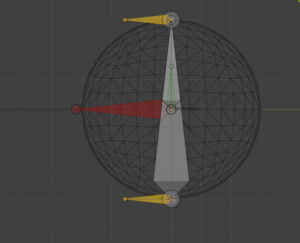
Generarally the ball needed a total of 5 bones. The rig consists of a root bone, a deformer bone, a rotation bone, a mechanical bone and two squash or stretch bones. The root bone is above all the other bones in the hierarchy and every other bone follows the root. The deformation bone is the only bone directly influencing the ball model However, the deformation is depending on the mechanical bone, which stretches from (a constraint) the base to the top squash.

I had a few brief moments of confusion due to the fact that I work in Blender 5.0 and the tutorials are in a 3 or 4 version of it. The general instructions were clear and easy to follow with a few pauses in between.

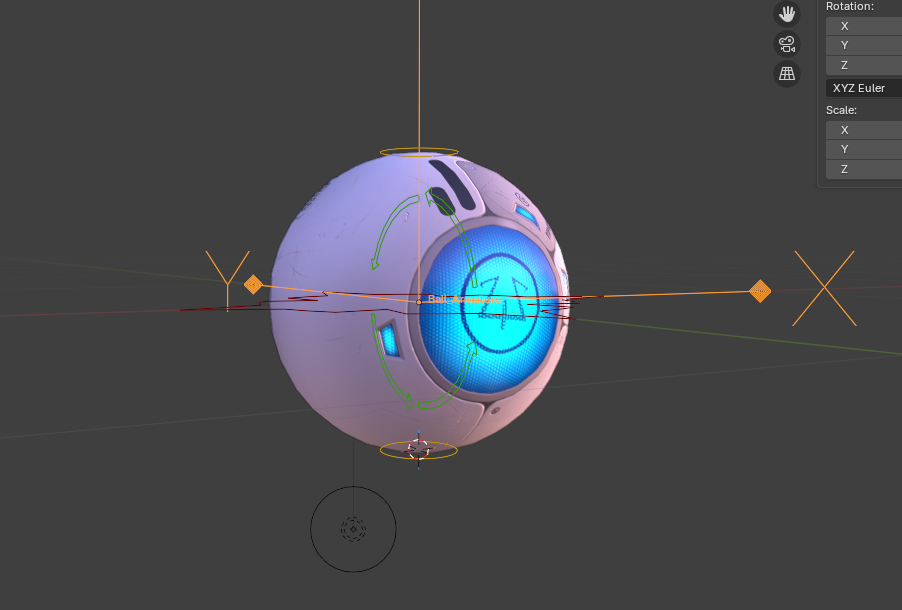
The finished rig is clear structured and read to be animated with.

Here is the rig in movement.

The next project in the tutorial is a spider ball. It is essentially a little robot which can hide its head and legs to look like a ball. It jumps from 5 lessons for the ball rig to 28 lessons for the spider ball rig. I assume I will have more to write about next time. Stay tuned!

D&R- Accessibility and Barriers (3/3)

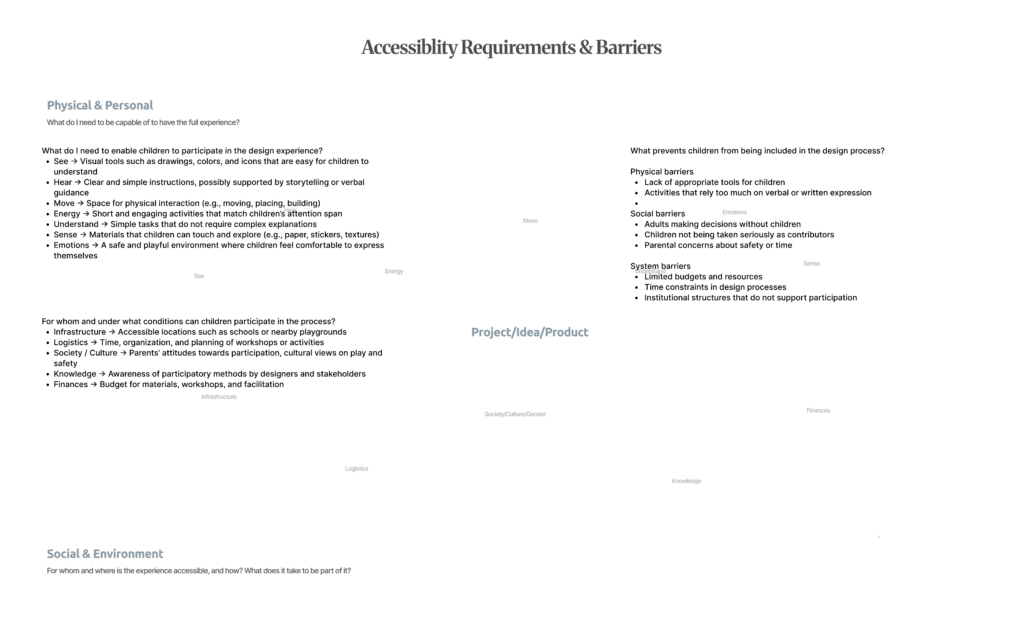
On a physical and personal level, participation requires tools and environments that match children’s abilities and ways of expression. Visual materials, simple instructions, and tactile elements such as stickers or drawing tools help make ideas more understandable and engaging. Equally important is creating a safe and playful atmosphere where children feel comfortable expressing themselves. Participation is not only about capability, but also about emotion and confidence.

At the same time, participation is shaped by broader social and systemic factors. Access to appropriate spaces, time for workshops, and available resources all influence whether children can be included. Cultural attitudes towards play and children’s roles in decision-making also play a significant part. In many cases, adults still dominate design processes, limiting children’s involvement.

Identifying barriers made this even more evident. These barriers are not only physical, such as the lack of suitable tools, but also social and institutional. Time constraints, limited budgets, and established decision-making structures often prevent participatory approaches from being implemented. Additionally, children are frequently not taken seriously as contributors, which further reduces their involvement.

D&R- Change and Impact (2/3)

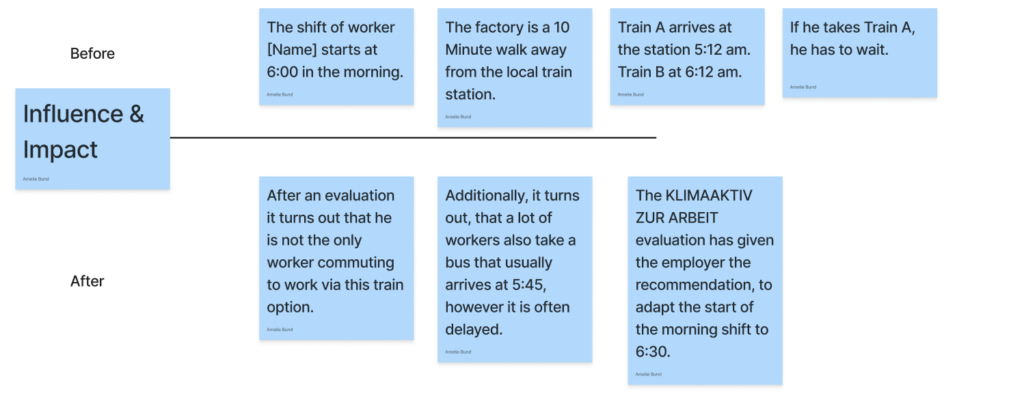
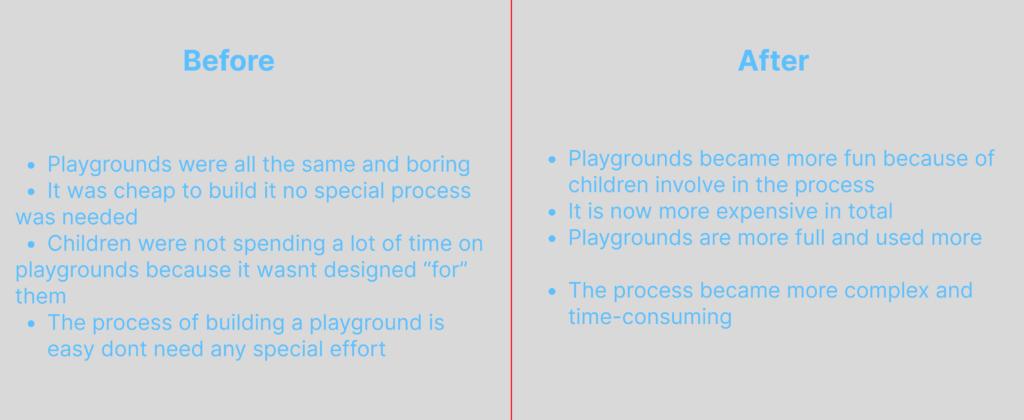
In the “before” scenario, playgrounds were often standardized, repetitive, and primarily driven by efficiency and cost. Design decisions were made without involving children, resulting in spaces that did not fully respond to their needs. As a consequence, children were less engaged, and playgrounds were not used to their full potential. The process itself was straightforward and inexpensive, but it lacked depth in terms of user experience.

In contrast, the “after” scenario highlights what changes when children are included in the design process. Playgrounds become more engaging, diverse, and meaningful, as they reflect children’s real experiences and desires. This leads to increased use, longer engagement, and a stronger sense of ownership among children. However, this shift also introduces new challenges. The design process becomes more complex, time-consuming, and resource-intensive.

D&R- System Map (1/3)

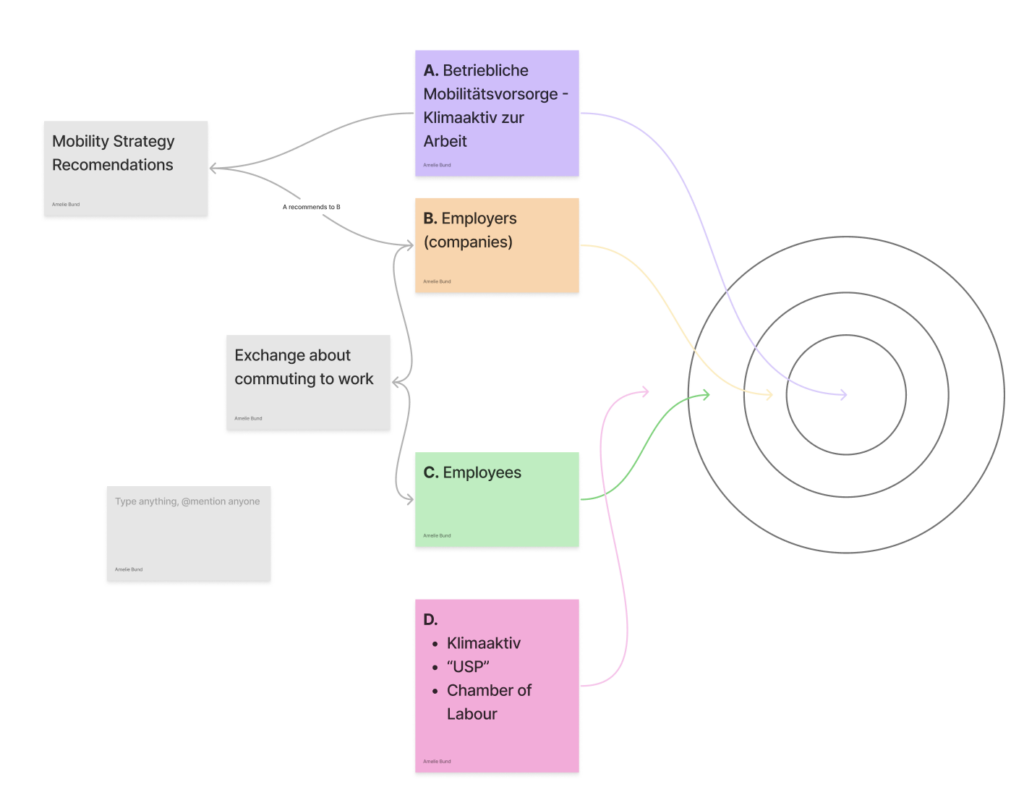
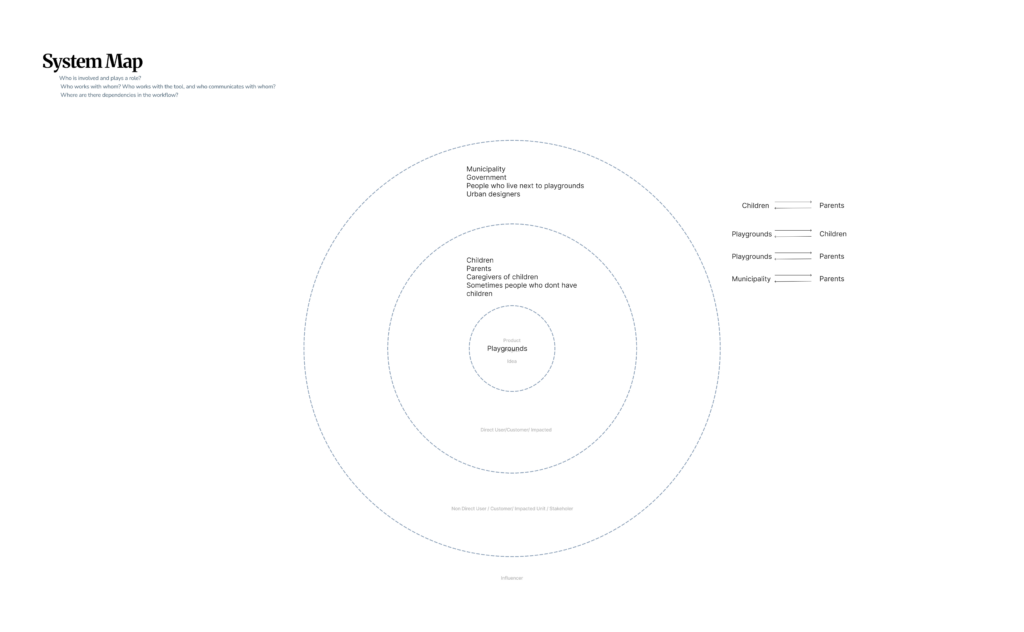
At the center of the system are playgrounds. Surrounding them are primary users such as children, parents, and caregivers, who actively engage with these spaces. Beyond this immediate layer, broader stakeholders like municipalities, urban designers, and local communities influence how playgrounds are designed, built, and maintained.

The map also highlights key relationships, such as the connection between children and parents, and the role of municipalities in shaping decisions that affect both groups. These interactions reveal that playgrounds are not isolated spaces but part of a larger social and institutional system.

Playgrounds is not only about physical structures, but about navigating a network of stakeholders, needs, and influences. This perspective reinforces the importance of including children’s voices within a complex design ecosystem.

My rigging journey – Part 1

For my design and research blog posts I chose to return to rigging. To start off what is rigging? Rigging is the process of creating a mechanism on how something should move. It is comparable to building a skeleton. This is also the reason why some of the used terms are joints and bones. As soon as one object moves or influences another it can be called rigging.

Rigging is a general term used for both 2D and 3D animation. It is the step between creating for example a character and the animation afterwards. In other words, it is the step most people would rather skip, as do I.  However, since it is one of the steps that keeps me from creating my own animations with my own models I want to get better at it. I have some experience in rigging for 3D programs. In my bachelor’s I learned some basics in maya. The lessons were very quick and hard to follow along. I learned the most in my internship at a tiny indie game studio where I got to model, rig and animate a grey heron as well as a badger. The most complex rig was a crow I made for bachelor project. However, half of it was with an auto rigging tool. I still had to do a lot of manual corrections and that bird had so many feathers I had to rig one by one.

Still, I feel like there was never a very solid base of knowledge for the rig and I only applied what I needed now. This caused some problems later with the rigs and I had to redo a lot. I want to change that. This is why I searched for an extensive course on rigging. I found “The Art of Effective Rigging 2” by Pierrick Picaut on his Website p2design academy. I have watched some of his free content on Youtube bevor and figured it would be a great fit. The lessons are detailed, files for every step are provided as well as a pdf document were everything is documented in written form. The course is spilt into 6 major parts, which get longer and more complex. The parts are: rigging fundamentals, my first rig, spider ball rig, simple character rig, advanced character rig and full character rig.

So far, I browsed through the first chapter of rigging fundamentals. For me most of it is just repetition of what I already know. I still listen to the lessons because the course is for Blender and I have less experience with Blender than Maya. The repetitions should also help with the basics I might have forgotten parts of it. So far, I enjoy the course, even though it is nothing new to me. Basics such as what is rigging, parenting, constraints, armature objects or bones where covered. I will not go too much into the detailed explanations.

As for my goal of the blog posts, I want to follow along the course as much as possible and make a short video of the rigs created. The result will probably not be looking very pretty. Rigging feels to me a little bit like coding. It is a lot of thinking work, which can be annoying but very rewarding when it finally works out.