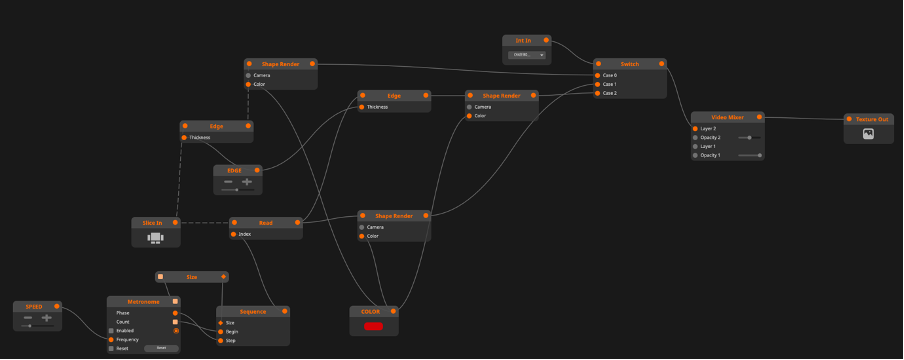
To stylize the slices used in projection mapping, I created a Resolume Wire patch. The patch recognizes the slice input/output and will fill out the outline with a color (currently red). The outline width is adjustable via MIDI controller. Furthermore, to make it even more interesting, I added multiple chaser effects within this patch that can be toggled on and off.
The patch:
What is a chaser effect?
A chaser effect is simple. If the output created in Resolume Arena has, e.g., 4 slices, then, e.g., on a 4 to the floor beat, the first slice lights up, then on the second beat, only the second slice and so forth, creating a chasing effect if the slices light up one after another from left to right. As if the slices are chasing each other.
Here is an example of a chaser effect used at an “Outworld” event. Creating the chaser effect within Wire is not the only option to make it. I’ve made project-specific chase effects within Arena, using different kinds of envelopes.
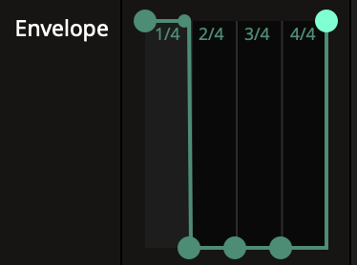
Ok, I’ll tell you what an envelope is first… An envelope is a similar principle to sound automation (if that rings a bell) or placing key frames on certain frames. The envelope is used to make the visual seem audio-reactive. By choosing a 4-beat envelope, the visual can be automated, e.g. the kick drum.
The picture above shows that the visual is enabled on the first beat and disabled during 2, 3 and 4. Now, if the second visual is enabled on the second beat only, the third visual enabled on the third and the fourth visual… you get it now. It creates a chaser effect. This is just one example of an envelope.
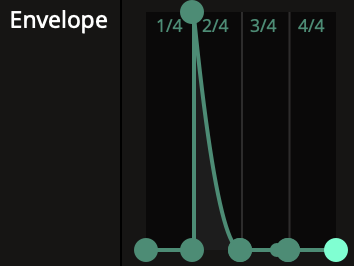
The first envelope shown earlier was an instant on and off, but the one seen below has a slower turn off time.
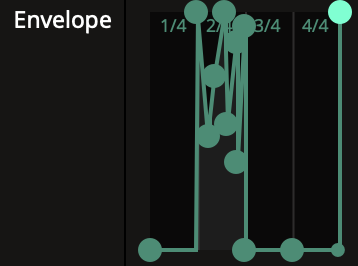
While the one seen below this paragraph specifically is a bit of an experiment of mine. The chaotic envelope type adds a strobing effect as the opacity of the visual switches many times during that one beat.
These experiments cause interesting audio-reactive looking effects during shows, keeping the audience’s attention and energy high.
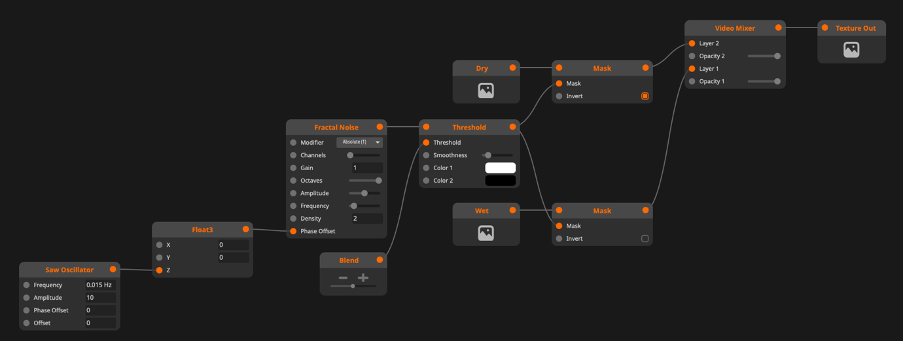
A Video Mixer in Resolume Arena enables smooth transitions between clips by blending two video sources in real time. Instead, hard cutting from one clip to another, it interpolates between them using adjustable blend or transition modes such as crossfade, Add, Wipe or Slide. The transition duration and blend mode are customizable, allowing for seamless visual continuity or more stylized scene changes during live performances. Having learnt about this feature, I thought I’d try making my own mixer in Resolume Wire.
Here is the Wire patch:
Node explanations:
A Saw Oscillator generates a repeating sawtooth waveform that ramps linearly from its minimum to maximum value before instantly resetting. It can be used to create continuous animations by driving parameters such as position or opacity at a controllable frequency.
The Fractal Noise generates procedural noise by combining multiple frequencies to create organic patterns. There is no need for pre-recorded or -rendered media.
The patch I created mainly works with these two nodes. As you might be able to imagine already, the transition look is blending between images with a fractal noise mask.
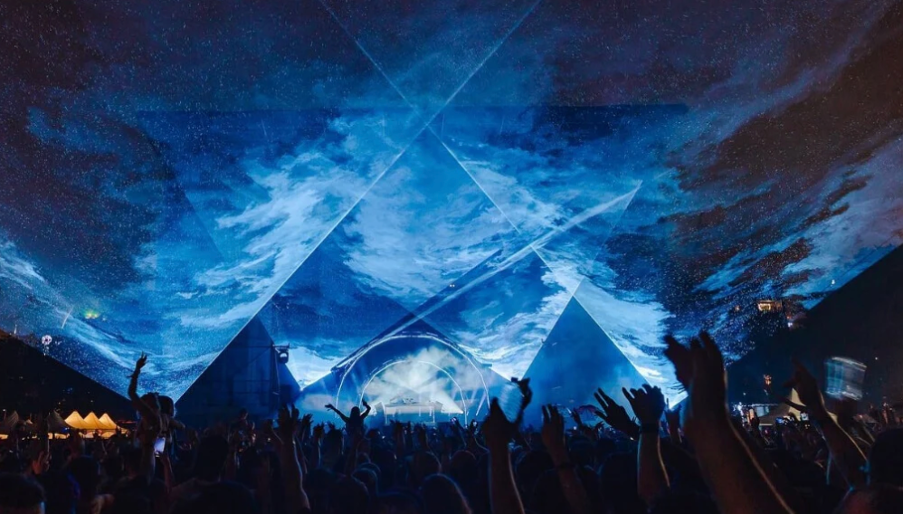
During a music festival a couple years ago, I encountered an experiment with a projector. The setup is quite simple: A hazer, a projector and a projection. But the outcome felt unique. The focus is not on the projected area nor the projected visual on it, but on the light that is projected between the space due to the haze in between (as seen below).
In light of Christopher Street Day (CSD), I experimented with this idea inside Resolume Arena.
Short video example of my experiments:
As explained earlier, the visual itself remains simple. However, if projected through haze, e.g. the rainbow circle won’t just be a circle, but become a colourful tube or tunnel that one can look through. That is because the haze becomes the area of projection, creating a 3D space instead of a flat screen or wall.
I want to take this idea from Resolume to a real space. Currently, I am in talks with other creatives and event organizers, with a possibility to bring this idea to Forum Stadtpark in the summer. Until then, I will continue experimenting until I find shapes that I want to bring to the physical space. By then, I need a Hazer (not a fog machine, there is a difference). If you’re reading this and have an idea where or from whom to get one without paying at least 100€, I’d be thankful for the tip!
Every conversation, every sound, every place, every fear, every act of kindness, every contradiction becomes another fragment. None of it disappears. It accumulates and waits. My work is not about expressing these experiences; it is about processing them.
I make data visible.
It started with a cube. A cube that could dance. That simple experiment never really ended. It became the foundation of everything that followed. I aim to build systems instead of scenes. I rarely recreate the exact same visual language twice because repetition belongs to machines, while experimentation belongs to people. Every performance is another iteration. Another process. Another possibility for something unexpected to emerge.
I don’t want visuals to decorate music. I want them to exist beside it. To breathe with it. To become another performer in the room.
When sound changes, image changes. When energy shifts, the visual body responds. Somewhere between light, movement and rhythm, the boundary dissolves. The audience stops looking at visuals and starts inhabiting them.
Electronic music has always been more than sound. It creates temporary worlds. Worlds where difference becomes strength, where strangers become a collective, where identities can exist without explanation. I believe these spaces deserve protection. They should remain places of solidarity against racism, queerphobia, transphobia, fascism, authoritarianism and every ideology built on exclusion. My work does not always speak these ideas aloud, but they are embedded in the systems themselves.
Technology is my material, not my subject. The software and hardware exist only to carry something human.
As part of the semester, I designed a VJ show to mix live at the Generate26.
Furthermore, I took it upon myself to curate part of the DJ line-up, with bookings such as the design collective “Curieux Dilettantti – with residents “KOMMODDITY” and “Disco Veloce”, and “Generator” collective resident “t.mane”.
Concept and Performance Approach
My goal for this visual performance is to focus on rhythm, spontaneity, and live visual mixing rather than relying on automation. The visuals will be performed in real time, much like a DJ mixes music, allowing for improvisation and responsiveness throughout the set.
The performance is a collaboration with my brother, who performs under the DJ name KOMMODDITY and is a co-founder of the music label and design collective Curieux Dilettanti (CXD). Because we are performing together, I can closely react to their mixing decisions and create visual moments that are synchronized with the music in ways that cannot be planned or repeated.
At its core, the project explores the relationship between two brothers working in sync. We aim to create a synesthetic experience in which sound and image become closely connected, allowing the audience to witness and experience our shared creative language.
Art Direction
The visual concept draws inspiration from the meaning behind KOMMODDITY’s artist name. The name references the idea that DJs and performers often become commodities within the music industry: public figures whose image, identity, and artistic output are packaged and consumed.
To reflect this idea, I use rotating 3D scans of ourselves presented like commercial products or collectible figurines. These digital representations emphasize the tension between artistic expression and commodification, inviting the audience to reflect on how musicians are marketed and consumed.
The visuals also incorporate graphic elements and logos from Curieux Dilettanti (CXD), the label and design collective co-founded by KOMMODDITY. Branding is deeply embedded within contemporary music culture, and these references acknowledge that reality. Rather than functioning as advertising or encouraging the purchase of music or merchandise, the intention is simply to make the audience aware of the label’s visual identity and its role within the project.
To further establish a personal visual signature, I created a kinetic animation of a cube-based logo. The cube is a recurring form within my work and serves as a recognizable element that connects the performance to my own artistic practice.
Music by KOMMODDITY 138-146 BPM
1,5 hrs journey through 3 techno sounds, thus 3 stages of the set
spacey hardgroove like Phil Berg – Rinn – will be a good transition to Dj t.mane
more bouncy “shake your hips” with few lyrics hardgroove like KOMMODDITY & Disco Veloce – XXMIGLIA – will be a good transition to Dj Disco Veloce
Visuals
Since my brother and I agreed on performing a 3-act narrative, I made sure that my main visual is procedural and can be mixed with multiple genres. Additionally, I produce addons that will be used mainly on the side screens and in low energy moments to then kick in the main visuals in high energy moments again.
Story Time Of course, as it was a first-time performance for me, something needed to go wrong. But let’s start at the beginning. The night before the event, preparations were made at the venue by mapping my Resolume project to the areas for projection. Two projectors were connected to my laptop via HDMI connection, and then 3 slices (a slice is the area in which pixels will be lit, pixels outside of the slice will be ignored) were created within Resolume Arena.
Example:
These are slices created for the visual output.
In the picture above, you see that a solid color is inserted, which normally would fill out the whole screen. However, it fills out the slices (3 triangles) only, as they are the mattes for projection.
To map the pixels correctly at GENERATE26, a plate provided by Moya was used.
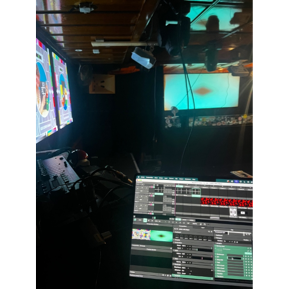
The setup was as seen in the picture below.
As you can see, the VJ is standing in the back of the room, operating the screens from a place without visibility of the crowd, as the crowd would be facing the DJ in the front.
Anyway, the next day, after a long day of listening to lectures of the GENERATE day event, I continued making preparations with my brother to curate music and visual mixing for our storyline.
Finally, at the event, at midnight, the performance of my brother and me was supposed to begin. In a rush, we took out the HDMI cables from the ceiling and brought them to the front. We just had to be at the front together. Of course, doing that in a rush, it caused problems. There were issues with the HDMI cables, so that the mapping wasn’t working right and on top of it, after solving that issue, the cables of the MIDI controller were causing issues as well. Resolume did not recognize the MIDI. While the music of my brother was already playing, I was stressed and anxious that I wouldn’t be able to perform together. After a few very awful and humbling minutes, the system worked again. Or so I thought. All my MIDI controller button settings were mixed up. While mixing the visuals, it often did not control the visuals the way I had prepared them at home before. Thus, I needed to mix the visuals while fixing my Resolume Arena project, all at the same time. Somehow, everything still kind of worked out. Dancers were having fun and I received very positive feedback about the visual performance and wholesome feedback about a brother-to-brother type of storyline. Everyone thought it is very cute that we look alike and perform together, which was made even more obvious through my 3D scan visuals. To my own surprise, I didn’t even stop performing after the time slot with my brother was over. I continued together with our friend Carl (Disco Veloce) until closing. What a blast!
In retrospect, I see that preparations need to be done more carefully. There was a lot of missing information that was gatekept by the organisers of the event unnecessarily, concerning projection mapping, mixing visuals live and the technical setup at the venue. In the future, I will be even more direct about the need for certain information early on and not be dismissed if I don’t receive it. And of course, I would like to be part of installing the equipment, to decide where the VJ setup is located. Next time, I won’t rip out the setup just before the performance begins. That was totally my bad ^^
Since I’ve learned that MIDI controller mapping can be destroyed randomly, I will create a fail-safe Resolume project backup, to hopefully have an unbroken one even if the original gets destroyed.
Sue Slagle (SUE-C) is a pioneering VJ and new media artist whose work redefines VJing as a form of live, performative cinema. Rather than treating visuals as a background layer in club contexts, she approaches them as a central artistic medium, creating what she describes as real-time cinema. In her performances, images are not simply played back but are constructed live, combining camera feeds, pre-recorded material, and generative processes into evolving visual compositions that unfold alongside sound.
A key aspect of SUE-C’s VJ practice is the idea of the setup as a hybrid visual instrument. Using tools such as Max/MSP and custom-built systems, she integrates live cameras, physical materials, and digital processing into a responsive performance environment. This allows her to “play” visuals with the same immediacy and sensitivity that a musician brings to sound. Her approach is highly improvisational, with visuals reacting in real time to music, performers, and the surrounding atmosphere, resulting in performances that are ephemeral and never exactly repeatable.
What distinguishes her aesthetic is the combination of analog and digital elements. She frequently incorporates handmade materials—such as drawings, photographs, fabrics, and everyday objects which are manipulated live and transformed through digital means.
This creates a visual language that feels organic, tactile, and layered, resisting the polished uniformity often associated with digital VJing. At the same time, her work often carries a narrative or conceptual dimension, moving beyond pure abstraction toward micro-stories, surreal compositions, or performative interactions that align her practice with experimental film and installation art.
An example that captures the physical and performative nature of her work is her “Wet Show” performance, documented on YouTube.
What is a Wet Show?
The history of VJing can be traced back to the expanded cinema and multimedia experiments of the 1960s, where artists began combining film, light, and live performance. Groups like USCO and The Joshua Light Show created immersive environments using projections, liquid light, and analog effects during concerts and happenings. These early “wet shows” referred to performances in which artists manipulated liquids such as oils, dyes, and water on glass plates under projectors to produce constantly shifting, organic visuals. The term “wet” distinguishes these fluid, hands-on techniques from later “dry” digital visuals. Over time, these analog practices evolved alongside video technology in the 1970s–90s, eventually leading to contemporary VJing, where artists perform visuals live using digital tools but often still draw inspiration from the tactile, improvisational nature of early wet shows.
In the above-mentioned wet show by SUE-C, she uses water as a central visual and material element, interacting with liquids, light, and projection in real time. The performance emphasizes the materiality of the image-making process, where distortion, reflection, and fluid movement become part of the live composition. It highlights her interest in blending body, medium, and environment, turning VJing into a multisensory act that exists between performance art and live cinema.
Overall, her VJ projects can be understood as a performative, improvisational, and materially grounded practice, one that transforms VJing from decorative visuals into a dynamic, cinematic art form created in the moment.
Truly a once-in-a-lifetime experience.
Since I like to experiment myself, I came up with my own wet show concept in which I want to reuse scans I took of graffiti in Graz. This could be combined with objects (trash) I find in Graz that align with the story that the Graffiti scans tell. This would lead to further expanding my own style as well, using only visuals of my own databank. I had an interesting discussion about this with Markus Zimmermann, as he always dreamt of being the kind of animator who is booked for their style, their artistic expression. No fuss, no redo this, redo that or change your color scheme. Clients know who they book and they would receive a “Rasmus project outcome” and that’s what they want (in theory). I believe I can achieve this, as I am observant, curious and playful, which are fundamentals for creating an “original style”.
In this VJ set for the live performance of the song “The Set Up” from 1980, the VJ uses short flashing sequences that alternate between a person and a vampire, visually echoing the song’s underlying tension and sense of entrapment introduced earlier. As the music gradually becomes darker and more vampiric, the Vampire in the VJ set seems to be getting closer to the human, increasing the sense of imminent danger, as if the “set up” is reaching its inevitable conclusion.
The choice of colors for the sequences is made deliberately: black and white to create that old-school vampire movie style, a cold blue tone for the vampire sequences, and sometimes yellow/orange or red for the sequences that include the human, creating a visual contrast that reinforces the narrative. This hints at the coldness of the vampiric creature, that it is undead, and in contrast, the human’s body is flowing with warm blood, making the image resemble a heat camera, further intensifying the sense of vulnerability and exposure introduced in the song’s atmosphere.
In combination with the music and light show (also without), this VJ set tells a story, going through the exposition, a climax and finally the resolution, seamlessly translating the sonic narrative into a visual one. This is the kind of artistic expression that I aim to go for as well, where sound and image are not separate elements but parts of one cohesive storytelling system. Therefore, the evening was highly inspiring and moreover, it made it seem so much more tangible and accessible, bridging the gap between conceptual idea and practical execution. I already had these ideas to make VJ sets with typical movie structures in mind within the production process, but now it is no longer just an idea in my head, but a concrete direction for future work. I know that it is achievable and that the idea can tell a good story at a music event.
After the show, I was so inspired that I went up to the VJ and had a talk with him about his performance that night. He was extremely kind and eager to show me his tools that he used and recommended me some software and websites for VJs. This also gives me a positive feeling for VJing as the community is very open and shares tools, software and many visuals for others to use and have fun with. As Markus Zimmermann always said in class: go and meet your heroes.
I wanted to take the opportunity and use this blogpost to talk about the topic of interviews for my research.
In class, we conducted interviews with each other – originally aimed at practicing how to handle an interview situation, which pointers to have in mind, how to interact with the interview partner and how to document the talk. I have to admit, however, that for me it turned out to be not just valuable as a practice opportunity but actually helped me in figuring out some key questions that I want/need to ask in my research. Furthermore, the talk with my interview partner already offered some interesting insights and new approaches I had not yet fully considered.
The interview I conducted was all about the topic of science communication with the following questions being at the center of the conversation:
Of course, it is a very large field, but are you generally interested in science and research?
Are there areas that are of special interest to you?
Which sources do you use for getting information about (scientific) topics?
Which formats do you find interesting?
How do you like content that is, for instance, being presented via social media, in podcasts or posters?
Can you think of any platforms/accounts/creators that are focused on scientific content?
Do you follow science platforms / accounts / creators?
If you get in touch with a scientific topic, for instance through a fun fact, are you interested in exploring the topic further?
Essentially, I wanted to find out about my interview partner’s personal experiences and opinions about the general topic of science communication formats. I was particularly interested if, and if yes which, science communication channels are interesting for the other person.
Although I tried to be neutral when I asked my questions, I was hoping for answers that support my general opinion on the potential of science communication formats and I was pleased to see that, at least in this case, I was under the impression that I am on the right track with my topic.
To give a short recap and analysis of the interview: the interview partner, while not having a specific interest in science topics, showed general curiosity and openness to them. He stated the platform YouTube, in particular, as the main source of engaging with science content. Even though he is not specifically searching for that kind of content, he has come across it through, for example, the suggested videos page and by now does follow some accounts and creators that he has learned to value for their appealing treatments of scientific topics. The way these creators present their topics and the trust in their reliability that accumulated over time are pivotal in the interview partner’s willingness to consume such specific content, the topics themselves not even mattering as much as the knowledge that a certain channel or person will present them in an appealing way.
Overall, the interview was extremely helpful for shifting my attention to YouTube as an important platform for educational content and gave me some ideas as to what matters when getting people to watch/consume scientific content. It leads me to believe that the „how“ is more important than the „what“. While the „what“ is something I believe is crucial when deciding which topics could be worth knowing about, the „how“ probably is an extremely important subject, especially in the beginning, where building trust with the public community might be more important than instantly teaching about complex issues. Furthermore, the way a topic is being presented can make or break the viewer’s interest. Essentially, it does not matter what one is talking about, it could be the most theoretical, boring information but if it is presented with enthusiasm, made to be entertaining, interesting and/or impressive, people can get inspired by it. Of course, the same is valid the other way around – viewers could lose interest in the most interesting topic if the presentation lacks all the attributes mentioned above.
I will definitely conduct further interviews to see which touch points are natural for people and what platforms and formats currently matter to them.
For that purpose, I put together a questionnaire that I just published as part of this blog posts topic. (If you are reading this, feel free to complete the survey, I would appreciate anyone taking the time to do so!)
It picks up on the questions I asked in my test interview with a bit more It is currently open for answers in the hopes of getting more insights that will help me create better science focused content.
After I finished the rig I wanted to play a bit with it. So I chose to pause the tutorial for one blog post. I animated the spider ball with the intention of showing off most of its features. I went back to the basics and animated a bouncing ball. I tried using the feature of blender to simulate a bounce with the interpolation method. However, it caused more problems than it helped. It never had contact with the ground except at the end and you could not manually adjust the height. Since it is an interpolation type it would generate the bounce between the new keyframes again and destroy the intended bounce. So I switched back to manually animating it. I went with switching the interpolation to stepped in the beginning – something we were taught in the bachelor to do. It is a lot easier to get the timing right with the stepped mode. I started with only animating the the x and y direction. Then I added the spin and at the end the squash and stretch.
As for the other movements I wanted to show off the head and the possibility of moving it like BB8 in Star Wars. So the ball rolls in, looks at the cam and rolls out again.
Last but not least I let my buddy show his full pride. He is all grown up ready for anything with its handguns.
It is a very quick animation and I normally would go over it again several times but as I only wanted it to show off its capability I am happy with the little showcase I created. The only thing I think the rig is missing, are some sort of eye lids or shutter for the head. You could immediatly create more emotions by adding them.
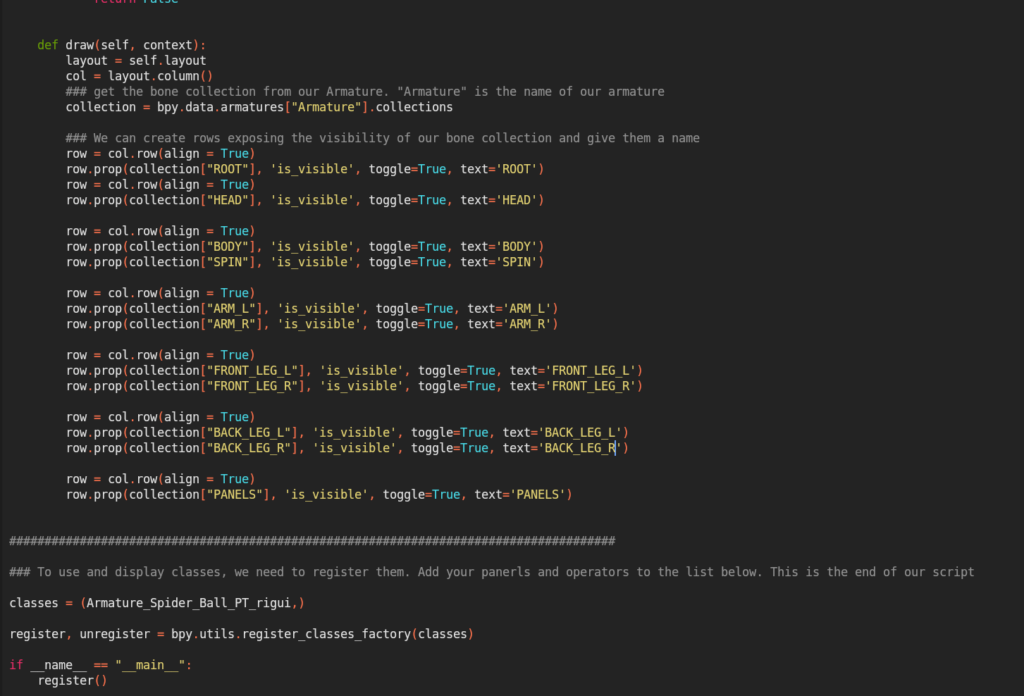
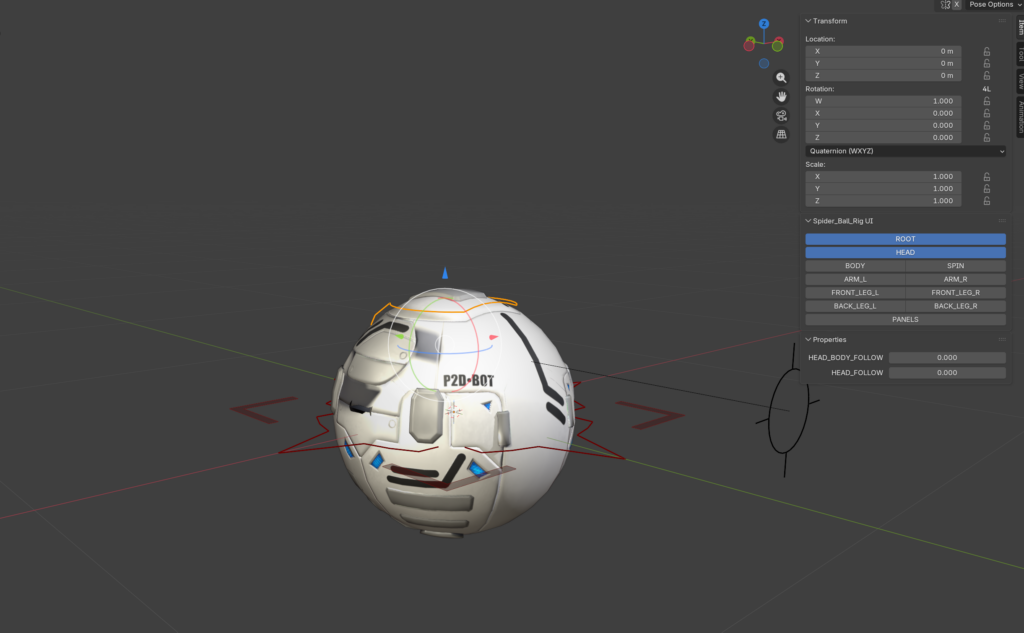
In the tutorial was only one step left. The rig got a UI with the help of python. A premade script was provided so it was easy to change for the needs of the individual rig. It essentially reads out the bone collections and their visibility of the armature. For that the armature needed to get a new custom property. The tutorial used a random string generator. A string is a combination of letters and numbers. This string was used as a rig id in the python script. With this it could find the right rig.
I have done some programming before which helps to not feel overwhelmed it. Despite me not having worked with python specifically, my creative coding lessons helped me to not feel lost. Even without the tutorial I could kind of understand what is happening. For the tutorial itself I only needed to change the names of the bone collection to what I had named them. One thing to remember for python is, that the rows and their structure is important. You can’t just indent a line. It will cause problems. By hitting text and then register the python script is now loading automatically with the blender file.
Conclusion
I am really happy with this rig. As far as I have tested it, everything works great. I appreciate how neat and structured everything is. Rigging can be a hassle and there is no need to cause yourself more problems by working half assed. I got reminded of this again, when a friend of mine had asked me to play doctor for her rig. It had at one point worked, but she could not move the IK arms anymore. I was so confused looking through the rig, trying to understand what was happening. Nothing was named correctly beginning with the whole armature which was called Leg1. I figured out, that she created the rig directly on the deformation bones. That alone caused tons of issues. Later I realized that she used rigify which apparently is known to create such issues. I found a weird bad work around for her rig and I created a video for her. It is not recommended to do what I did, but for fun I post it here as well.
Still now something was very off with her weight painting. Or has it always been off? I don’t know, but it reminded me of how little time I had during my bachelor’s for rigging. Creating a nice clean rig with enough time to struggle on some point wasn’t in the curriculum.
So much for my rigging journeyso far. Meanwhile, enjoy my bot showing off his rig’s abilities. 😉